Tuesday, March 30, 2010

World Peace Cookies


Not all that long ago, yet too long ago, I took what was the most magical, wondrous, and tasty trip of my 22 years of life. For eight blissful days, my step-mom, Andrea, and I navigated the streets and sights of Paris. Classes at Le Cordon Bleu in the morning, early afternoon naps, cups of near perfect coffee, and more beautiful artwork and architecture than one can even possibly process in eight days. Sure, it rained hard the first four days of the trip, and I did a dreadful job packing appropriate clothes for the weather, but none of that seemed to matter. I was falling in love with Paris. 

Did I mention we ate well? Armed with a list of places to see and eat from my deputy editor (this is one woman who knows her way around Paris) we hopscotched around the city, checking restaurants and bakeries off our list as the days passed by. I was told that visiting Pierre Herme was an absolute must. When we finally arrived I was enchanted by a tiny jewel box of a bakery with a line a mile long - patrons in search of the most amazing sweets on earth. 

Yes, I spent 6 euro (around $9.50 at the time) on a single macaron, but oh was it worth it. What I didn't have was one of these World Peace Cookies. And though I replicated them in my own kitchen, with the help of Dorie Greenspan who convinced Pierre Herme to cough it up for us home cooks, I hope someday to try one from the source. Right now I can't imagine how these cookies could get any better. They are, like Paris itself, magical. Crumbly, light, rich, and chewy all at once - the kind of cookies that make you believe anything is possible. 

Follow the recipe carefully. It is by no means a difficult recipe, but the dough may prove a bit tricky to work with. Make sure the butter is very soft, refrigerate the dough for the recommended 3 or more hours, and let the cookies cool completely on the cookie sheet before moving them. Remember these tips and you should have cookies that evoke world peace, or a cookie riot, in no time.

World Peace Cookies
From Paris Sweets by Dorie Greenspan 
  • 1 1/4 cups all-purpose flour
  • 1/3 cup unsweetened cocoa powder
  • 1/2 teaspoon baking soda
  • 1 stick plus 3 tablespoons (11 tablespoons) unsalted butter, at room temperature
  • 2/3 cup (packed) light brown sugar
  • 1/4 cup sugar
  • 1/2 teaspoon fleur de sel or 1/4 teaspoon fine sea salt
  • 1 teaspoon pure vanilla extract
  • 5 ounces bittersweet chocolate, chopped into chips, or a generous 3/4 cup store-bought mini chocolate chips
1. Sift the flour, cocoa and baking soda together.
2. Working with a stand mixer, preferably fitted with a paddle attachment, or with a hand mixer in a large bowl, beat the butter on medium speed until soft and creamy. Add both sugars, the salt and vanilla extract and beat for 2 minutes more.
3. Turn off the mixer. Pour in the dry ingredients, drape a kitchen towel over the stand mixer to protect yourself and your kitchen from flying flour and pulse the mixer at low speed about 5 times, a second or two each time. Take a peek — if there is still a lot of flour on the surface of the dough, pulse a couple of times more; if not, remove the towel. Continuing at low speed, mix for about 30 seconds more, just until the flour disappears into the dough — for the best texture, work the dough as little as possible once the flour is added, and don't be concerned if the dough looks a little crumbly. Toss in the chocolate pieces and mix only to incorporate.
4. Turn the dough out onto a work surface, gather it together and divide it in half. Working with one half at a time, shape the dough into logs that are 1 1/2 inches in diameter. Wrap the logs in plastic wrap and refrigerate them for at least 3 hours. (The dough can be refrigerated for up to 3 days or frozen for up to 2 months. If you've frozen the dough, you needn't defrost it before baking — just slice the logs into cookies and bake the cookies 1 minute longer.)
Getting Ready to Bake:
5. Center a rack in the oven and preheat the oven to 325 degrees F. Line two baking sheets with parchment or silicone mats.
6. Using a sharp thin knife, slice the logs into rounds that are 1/2 inch thick. (The rounds are likely to crack as you're cutting them — don't be concerned, just squeeze the bits back onto each cookie.) Arrange the rounds on the baking sheets, leaving about 1 inch between them.
7. Bake the cookies one sheet at a time for 12 minutes — they won't look done, nor will they be firm, but that's just the way they should be. Transfer the baking sheet to a cooling rack and let the cookies rest until they are only just warm, at which point you can serve them or let them reach room temperature.
Happy Baking! 
Madison 

Sunday, March 28, 2010

Double Chocolate Muffins


Weekends are near the top of my list of favorite things, and while there may not be a hard and fast formula for a great weekend, I've found that if you combine at least two of the following, you are guaranteed to have a fabulous two days:
*Beautiful weather
*Loved ones
*Baking a new recipe
*Scrabble
*Exercise
*Good food
*Lots of coffee
I was lucky enough to have a weekend that included all of the above. And while I would hardly be able to justify baking chocolate muffins for breakfast on my own, J.'s visit and some extra time on a Sunday morning was enough to inspire trying out a new recipe. I've had The Hummingbird Bakery Cookbook on my book shelf for almost six months now, but thus far the closest I've gotten to using it has been looking at the pretty pictures.

I'm a little bit sad I didn't start baking from it earlier because these Double Chocolate Muffins were to die for. Serious chocolate goodness for my boyfriend who loves chocolate just as much as any girl I know. And the best part was that I could mix it all together in one bowl, with a whisk and nothing else. The only question I have now is what is the difference between a muffin and a cupcake? After eating these, I'm all sorts of confused....


Double Chocolate Muffins
Adapted from The Hummingbird Bakery Cookbook
Ingredients:
*1 egg
*1/2 cup sugar
*3 Tbsp. unsweetened cocoa powder
*1/2 cup all-purpose flour
*1/8 tsp. salt
*1 tsp. baking powder
*1/3 cup milk
*5 Tbsp. butter, melted
*3/4 cup semi-sweet chocolate chips

Instructions:
*Preheat oven to 350*F. Line a mini-muffin tin or regular muffin tin with liners, or grease the tin with nonstick cooking spray. Set aside.
*In a medium mixing bowl, beat together egg and sugar. Beat in the cocoa powder, flour, salt, and baking powder until well combined. Beat in the milk, followed by the melted butter until just combined, followed by the chocolate chips.
*Spoon the batter into the baking tins, filling each 2/3 of the way full. Bake 12 minutes for mini-muffins or 28-30 minutes for regular-sized muffins. Cool on wire racks.

Happy Baking!

Madison

Thursday, March 25, 2010

Black Bean and Corn Salsa


 It's a beautiful day here in Iowa. The kind of day that makes you forget winter ever existed and makes you fall in love with this crazy state all over again. Goodbye boots, heavy coats, scarves, and gloves. Hello sundresses, sandals, sunglasses and the like. Well, maybe I'm getting a bit ahead of myself since it's only going to be sunny and 51* today - hardly flip flop and swim suit weather. But there's no denying this weather has got me in a summer state of mind.

When it comes to summer foods, there's something so simple and refreshing about chips and salsa. This less than traditional salsa is one of my favorites for its ease, versatility, and plain old deliciousness. Sure, it's great for dipping chips into, but is also a heartier version than the tomato-based varieties, making it perfect for serving in fajitas, on tacos, or as another nacho topping. If you want a bit more heat, up the amount of chili powder, toss in a chopped jalapeño or a few dashes of hot sauce. This salsa saves well in the fridge for up to a week. However, add the avocado just before serving to avoid browning or discoloration.


 Black Bean and Corn Salsa
Ingredients:
*1 (15-oz.) can black beans
*1 (15-oz.) can whole kernel corn
*1-2 avocados
*1/4 cup chopped cilantro
*Juice of 1 lime
*2 Tbsp. olive oil
*1/4 tsp. chili powder
*Salt and black pepper

Instructions:
*Wash and drain the black beans and corn in a strainer/colander. Place the strained beans and corn in a serving bowl.
*Peel and chop the avocado(s) and add to the corn mixture. Add in the cilantro, lime juice, olive oil, and chili powder. Toss to coat. Salt and pepper to taste.

Happy Cooking!

Madison

Sunday, March 21, 2010

Tangy Dijon Coleslaw


Yesterday I.....

...spent too much money on a high-tech scale that tells not only weight but body fat percentage.

...tried on swimsuits during a quick trip to return a dress at the mall.

...came to the realization that summer is right around the corner, and a spring vacation to Florida (hello beach!) is even closer.

Apparently I'm a glutton for punishment, because I can't imagine what else would result in such behavior. But I tell you all this so you'll understand why Espresso and Cream is getting a bit of a healthy makeover. Not to worry, there will still be sweets every now and again. Just think of it as me doing my part as a food blogger to get you ready for swimsuit season.

I've never really been a fan of coleslaw. Covered in so much white mayonnaise dressing you can hardly see any of the ingredients, it's always seemed like the vegetable equivalent of lunchroom mystery meat. So to remedy this problem and make peace with coleslaw once and for all, I set to work creating a dressing that wouldn't cover up the ingredients, but enhance them. Zippy, tangy, with the right combination of sweet and salty, (and no mayo!) this is not your run of the mill coleslaw. If you've had issues with slaw in the past, give this recipe a try.


Tangy Dijon Coleslaw
Ingredients:
*2 cups shredded carrots
*3 1/2 - 4 cups red cabbage, shredded or thinly sliced
*1/4 cup light sour cream
For dressing:
*1/4 cup Dijon mustard
*3 Tbsp. olive oil
*2 Tbsp. balsamic vinegar
*2 Tbsp. cider vinegar
*1 Tbsp. dried dill
*1/2 tsp. ground cumin
*1 tsp. kosher salt (or 1/2 tsp. regular salt)
*1 Tbsp. brown sugar

Chopped fresh cilantro or parsley for garnishing (optional)

Instructions:
*Place carrots and cabbage in a large bowl.
*In a small bowl or glass, combine all the ingredients for the dressing and whisk until well combined. Pour the dressing over the carrot/cabbage mixture and toss to coat evenly. Top with freshly chopped cilantro or parsley, if desired. Refrigerate until ready to serve. Serve within 1-2 hours of tossing with dressing.

Make it a meal:
*Toss in two cups of shredded chicken (those rotisserie chickens at the grocery store are great for this!) and serve in toasted pita breads or on whole wheat hamburger buns.

Happy cooking!

Madison

Saturday, March 20, 2010

White Chocolate Cream Puffs


Looking back at my childhood, I think my mom was preparing me for a career in food. I may not have eaten a peanut butter and jelly sandwich until 7th grade and have yet to try gravy, but I did frequently experience the joy of biting into a freshly baked sourdough roll or sitting down to a dinner of homemade beef stew and biscuits. And while other parents may have run to the bakery on occasion, my mom whipped up a batch of cream puffs.

I can still remember the way the wooden spoon swirled the dough around in the pan and the magic of pulling the cream puffs out of the oven - transformed from spoonfuls of dough into hollow puffs perfect for filling with rich cream. They are the kind of dessert that makes you wonder why you would ever buy another cream filled doughnut again.

White Chocolate Cream Puffs
Adapted from Mango Cream Puffs | Bon Appétit, May 2006
Ingredients:
*1 cup whole milk
*1/2 cup (1 stick) unsalted butter, diced
*1/4 teaspoon salt
*3/4 cup all purpose flour
*4 large eggs
*2 large egg yolks

*1 cup heavy cream
*1 tsp. vanilla extract
*1 cup white chocolate chips
*1 Tbsp. vegetable oil

Instructions:
For puffs:
Preheat oven to 375°F. Line 2 large rimmed baking sheets with parchment paper. Bring milk, butter, and salt to boil in heavy large saucepan over medium-high heat, stirring until butter melts. Add flour all at once. Reduce heat to medium and stir with wooden spoon until dough forms ball and some batter films bottom of pan thickly, about 4 minutes. Transfer dough to medium bowl and cool 5 minutes. Using electric mixer, beat in eggs and yolks 1 at a time.

Drop dough by generous tablespoonfuls 3 inches apart onto baking sheets, making about 12 puffs.

Bake puffs 15 minutes. Reverse sheets and bake puffs until deep golden, about 10 minutes longer. Make small slit in side of each puff. Return to oven, turn off heat, and let dry 15 minutes. (Can be made 6 hours ahead. Let stand at room temperature.)

For cream:

While puffs cool, make cream. Melt the white chocolate chips until smooth. Add the oil to the white chocolate and stir until well combined. Allow the chocolate to cool slightly (just slightly above room temperature). Combine cream and vanilla in the bowl of an electric mixer. Beat on high speed for 1-2 minutes. With the mixer running, slowly pour the white chocolate mixture into the cream. Beat until stiff peaks form. Refrigerate until ready to use.

To assemble, with a small sharp knife, cut the cream puffs in half horizontally. Spoon cream by heaping tablespoons in between the layers. Drizzle with caramel sauce or chocolate sauce, if desired.


Happy Baking!

Madison


Wednesday, March 17, 2010

Peanut Butter-White Chocolate Chip Cookies


When I first started baking, chocolate chip cookies were my greatest source of frustration. It seemed that everyone except me had their own trademark recipe. And while I could properly duplicate a batch from the back of the Toll House bag, it wasn't enough. After two years and many trials, it finally happened. It was love at first bite and after that moment, there was no looking back.

At this point you might be wondering where the chocolate chips are. The short answer is there aren't any. People, just as much as recipes and the food itself, influence me in the kitchen. And so when a high school friend told me he didn't like chocolate chips, a substitution of white chocolate and peanut butter chips seemed appropriate. But the adaptations and add-ins don't stop there.

When I first made these cookies, I was cooking with Mexican vanilla I had lugged home in my suitcase after a recent vacation. If you're not familiar with Mexican vanilla, it has a hint of cinnamon flavor, and when my bottle ran out, I started adding cinnamon into the cookies to compensate. The drizzle of molasses builds on the rich cinnamon flavor, giving the cookies a slightly deeper flavor and an extra bit of chewiness. Add in some peanut butter and a whole lot of peanut butter and white chocolate chips and you have yourself one heck of a cookie, though I think calling it a chocolate chip cookie at this point would be a bit misleading.


Peanut Butter-White Chocolate Chip Cookies
Ingredients:
*3/4 cup butter
*3/4 cup sugar
*3/4 cup brown sugar
*2 large eggs
*1/4 cup peanut butter
*1 tsp. ground cinnamon
*2 tsp. vanilla extract
*1/4 tsp. salt
*1/2 Tbsp. full-flavored molasses
*1 tsp. baking soda
*2 1/4 cups all-purpose flour
*3/4 cup peanut butter chips
*3/4 cup white chocolate chips

Instructions:
*Preheat oven to 350*F. Grease or line with parchment paper two baking sheets. Set aside.
*With an electric mixer, beat the butter until fluffy, about 1 minute. Add in the sugar and brown sugar, and beat on medium speed for 4 minutes. (Trust me on this one, the mixture will become pale and fluffy and allow the sugar to blend with the butter. Just time it out - 4 minutes.)
*Add in the eggs, one at a time, beating until combined. Beat in the peanut butter, cinnamon, salt, and molasses.
*Mix together the flour and baking soda. Add the flour mixture to the wet ingredients in two additions, beating just until flour is combined.
*Beat in the peanut butter chips and white chocolate chips by hand. Scoop the dough by heaping tablespoons onto the greased or lined baking sheets. Bake for 12-14 minutes. (I find 13 minutes to be perfect) Remove from oven and allow the cookies to cool on the baking sheets for 5 minutes. Place on wire racks and cool completely.

*Side note: Prior to this post, I swore I would never give up this recipe. But after some consideration, I feel that it would be cruel not to share it. Bake, eat, and enjoy!

Happy Baking!

Madison


Tuesday, March 16, 2010

Banana Oatmeal Breakfast Muffins


Last night, one of my oldest and dearest friends (yeah, I know I'm only 22 so how 'old' can this friend really be, but just play along) gave me a call to catch up. Like me, he recently graduated from college and is adjusting to life in the real world, which includes feeding himself.

I'm not entirely sure how the topic of eating habits came up, but after our conversation I'm pretty sure he wishes it hadn't. Because after telling me he eats up to 10 fast-food meals a week, starts every morning off with a Pop Tart, and gets on average one fruit or vegetable a day, I went on to spend the next 20 minutes telling him how he is going to die prematurely or live the rest of his life dependent on prescription medications. Yup, I can be a charmer on the telephone. I promise, it was all said out of love.

But what our conversation really did was get me thinking - about food, nutrition, and taking small steps in the right direction. Maybe it's not about being perfectly healthy, just a bit healthier than the day before. So while my plan was to make these muffins with 100% whole wheat flour, I reconsidered and tried to create a breakfast muffin that would be healthier than a Pop Tart but would satisfy those, like my friend, who are reluctant and skeptical.

Many times whole wheat flour gives baked goods a denser, heavier texture. So to mimic the texture of a muffin made with 100% all-purpose flour while adding in a fiber-rich dose of whole grains I settled on a combination of 50/50 all-purpose flour and instant oats. I found the combination to be the compromise I was hoping for. Instant oats, which are ground finer than regular rolled oats, don't weigh down the texture of the muffins like whole wheat flour might and instead yield a light, airy texture. The other great part of this recipe is its adaptability. Feel free to play around by substituting a cup of canned pumpkin, cooked and mashed sweet potato, or grated zucchini for the mashed bananas.


Banana Oatmeal Breakfast Muffins
Loosely adapted from "Whole Wheat Muffins" by The New York Times
Ingredients:
*1/2 cup butter, melted
*2 medium bananas, mashed
*1 egg
*1/2 cup milk (I used 1%)
*1 tsp. ground cinnamon
*1/4 tsp. baking soda
*2 tsp. baking powder
*1/4 tsp. salt
*1 1/4 cup all-purpose flour
*1 1/4 cup instant oats
*3/4 cup sugar
Topping:
*2 Tbsp. brown sugar
*1/2 tsp. ground cinnamon

Instructions:
*Preheat oven to 375*F. Line a 12-cup muffin tin with liners and set aside.
*In a bowl with a fork or whisk, mix together butter, bananas, egg, milk, cinnamon, baking soda, powder, and salt until well combined.
*In another bowl, mix together flour, oats, and sugar. Add dry ingredients to wet ingredients and mix together until just combined, scraping the sides and bottom of the bowl as necessary.
*Evenly divide batter among the 12 muffin cups. Combine the brown sugar and cinnamon and sprinkle over the 12 muffins. Bake for 18-20 minutes until lightly golden and a toothpick inserted in the center comes out clean. Cool on a wire rack.


Happy (healthy) Baking!

Madison

Monday, March 15, 2010

Amaretto Chocolate Truffles


Ahhh if only every weekend could be a four-day weekend. Needless to say, a trip to the mountains of Winter Park was much needed. While I did manage to escape from reality for a few days, the flight back gave me ample time to think about what I wanted to share with you all. When I got home I set down my suitcase, made a list, and headed to the grocery store for supplies. Then I got back to work in the kitchen with my camera. Vacations are great, but it feels good to be home.

After last week's Triple Chocolate Tart post, I realized that I have posted only a small handful of chocolate recipes. It's not that I don't like chocolate, it's just that I don't ever really crave it. But when I do have chocolate, it has to be good. I hate to quote Martha Stewart too many times, but sometimes it's just necessary. These truffles are a very good thing.

Amaretto Chocolate Truffles
Ingredients:
*10 oz. semi-sweet chocolate
*3/4 cup heavy cream
*2 Tbsp. Amaretto liquor
*1/4 tsp. kosher (coarse) salt
*Chocolate sprinkles, coconut, chocolate shavings, or other coating of choice

Instructions:
*Chop chocolate into coarse pieces and place in a mixing bowl. Set aside.
*Heat cream, stirring frequently, in a small saucepan over medium-low heat until cream begins to steam slightly and a few bubbles appear at surface. Remove from heat and pour over chopped chocolate. Stir until chocolate is melted completely and smooth. Add in Amaretto and salt. Stir until well combined.
*Pour melted chocolate mixture into 9x13 pan, spreading into a thin, even layer. Refrigerate for at least an hour.
*Remove from refrigerator. Scoop out heaping teaspoons of the chocolate mixture and form into balls. Roll the balls in chocolate sprinkles until evenly coated. Refrigerate until ready to serve.


Happy baking!

Madison

Friday, March 12, 2010

Super Simple Carrot Soup


This post is going to have to be short and sweet. You see, I'm going away for the weekend. Flying away to be exact. To Colorado for a long weekend of skiing with family and friends. I've been skiing since I was very little, but my last ski trip (to Vermont) was more than memorable. It involved a family road trip, a lost driver's license, and three days of skiing with four Floridians (my sisters, step-mom, and dad) - two of which hadn't ever seen snow before the trip.

I spent a lot of time skiing alone. Which is why I'm so excited to get to Colorado for some great skiing with some even better people.

But you're here for the food, not my family vacation stories. So.....

Do not, for one second, think that I can't see the irony in following up a sinfully-rich chocolate tart with a bowl of carrot soup. But people, myself included, seem increasingly concerned with balance, which for me means I can fill your minds with sugar-coma-inducing desserts as long as I intersperse a few vegetables in between posts, right?

I have made this carrot soup for more events than I can even name, most recently for the first course of my extended family Thanksgiving. It's so easy, and it never ceases to amaze me how many people ask me for the recipe. The carrots give great texture to the soup, and the spices and bacon bring plenty of salty, savory goodness. A few months back, I posted this recipe on my website. And now I'm bringing it to Espresso and Cream. For the 'Super Easy Carrot Soup' recipe, click here.


Enjoy your weekend!

Madison

Wednesday, March 10, 2010

Triple Chocolate Tart

Can I confess something to you?

I have a serious case of guilt. You see, in my mind blogs are supposed to be magical, fun, creative, and above all - delicious. But after weighing you all down with my last post full of talk about fruit, vegetable, and calorie counts I figured I owed you an apology. Sure, fruits and veggies are very important, but sharing with you something as mundane as a smoothie, and then having the audacity to name it 'Fruit and Veggie Smoothie' (really? eeek!) It all makes me want to cringe

So to say I'm sorry, I'm giving you chocolate, more specifically a chocolate tart filled with chocolate ganache and homemade chocolate pudding. And oh my gosh is this thing good. It's rich, intense, and may possibly have the power to send you into a chocolate coma, but if I'm going to go, death by chocolate tart sounds like a pretty sweet way to do it.

The process looks long, but don't let that scare you. The whole thing comes together pretty quickly - it took me less than 40 minutes to assemble. Instead of the more expected, crunchy graham cracker crust, I went in the opposite direction with a cakey chocolate shell that yielded a crispy edge and spongy center. Ganache, the second layer, is a thick icing/pastry cream made of cream and chocolate. Once it cools, the texture is thick and fudgy and provides nice contrast to the lighter chocolate pudding layer.

I'm sorry for weighing you down with the practical side of life. Please accept my peace offering of chocolate - three ways. Because I'm more concerned with your taste buds than your hips. :)

Ingredients:
Cookie Tart Shell
*1 box devil's food cake mix
*1 large egg
*1/3 cup vegetable oil
*1/4 cup water

Ganache:
*1 cup heavy cream
*10 oz. semi-sweet chocolate, chopped
*1/8 tsp. kosher salt (coarse sea salt)

Chocolate Pudding:
adapted from Smitten Kitchen via Wednesday Chef
*1/4 cup cornstarch
*1/2 cup sugar
*1/8 tsp. salt
*1 cup heavy cream
*2 cups 2% milk
*6 oz. semi-sweet chocolate, chopped
*1 tsp. vanilla extract

Instructions:
*Preheat oven to 350*F. Grease a 10-inch tart pan with cooking spray. Set aside. (if you don't have a tart pan, you can use a pie plate)
*With electric mixer, beat together cake mix, egg, oil, and water until mixture forms a dough. Press dough into tart pan. Bake 12-14 minutes, until crust is puffed up. Cool on a wire rack.
*Next, prepare the ganache. Heat the 1 cup cream in saucepan over medium heat, stirring frequently, just until cream begins to simmer (A mixture is considered to be 'simmering' when a bubble rises to the surface every 1 to 2 seconds but not more.)
*When mixture begins to simmer, remove from heat and pour cream on top of the 10 oz. chopped chocolate. Stir mixture until chocolate is melted. Pour the ganache into the tart shell. Sprinkle the top of the ganache with the 1/8 tsp. kosher salt. This is important. With all the chocoalte, a bit of salt helps to bring out the flavors and break up the sweetness every so slightly. Do not skimp on this part. Then, place tart in refrigerator.
*Then, prepare chocolate pudding. In saucepan, combine corn starch, sugar, and salt. Stir together until evenly combined. Slowly add in the 1 cup cream and 2 cups milk, stirring until smooth. Place saucepan over medium heat. Cook, whisking constantly, 15-18 minutes, until mixture is thickened. (During this process, do not let the mixture boil or bubble. It should thicken slowly, without boiling or simmering. The mixture may let off steam, which is normal. If it starts simmering, remove from heat immediately, continuing to stir, then return to heat.)
*After the pudding mixture is thickened, remove from heat and add in the chocolate and vanilla extract. Stir until chocolate is melted and mixture is smooth. Pour the pudding over ganache in tart. Refrigerate 2 hours, until pudding is cooled and ganache is set.


Happy Baking!

Madison

*Update: Because I care deeply about each and every one of you, I took it upon myself to have a sliver of this cake for breakfast. I can safely assure you that it's still good out of the refrigerator the next morning. That's just the kind of self-sacrificing person I am.

Tuesday, March 9, 2010

Fruit and Veggie Smoothie

Most nights before dinner I do a mental tally to track how many fruits and veggies I've had throughout the day, and most nights it's not much of an uplifting experience. I'll be honest, sometimes my food 'pyramid' is dismally out of balance. Heavy on the carbohydrates, low on fruits and veggies, you know the drill. And while I've never been much of a fruit juice or V8 drinker, I am a big advocate of the smoothie.

I've had quite a few people ask me what eating at my apartment looks like on a daily basis. Most of the time, dinner is nothing worth writing home about. If I end up short on the mental tally of fruits and vegetables, it's not uncommon for me to sit down to a dinner of steamed broccoli and whole wheat toast, a sweet potato and green beans, or a smoothie like this one. That's being a food editor for ya. Not all that glamorous when no one is watching. :)

So while this smoothie is not exactly dinner party fare, it is great for you. You'll notice there is spinach in the recipe. No, it's not a mistake - spinach is my favorite veggie to blend into smoothies because of its mild flavor. And while I'm not an advocate of 'sneaky cooking,' this is your opportunity to sneak a few extra vegetables into your kid's or spouse's diet. The single serving recipe below delivers 2 servings of fruit, 1 serving of vegetables and only 310 calories. Upping your fruit and veggie count doesn't get any better than that.


Ingredients:
*1/2 cup water (or milk, if desired)
*1 cup light vanilla yogurt (such as Dannon Light and Fit)
*1 cup frozen spinach
*1 medium banana
*3/4 cup frozen mixed berries
*4 ice cubes
*2 tsp. Splenda, Honey, or other sweetener (optional, I used Splenda)

Instructions:
*Blend all the above ingredients together in a blender until smooth. Pour into a glass and enjoy!

Happy Cooking!

Madison

Friday, March 5, 2010

Red Wine Pot Roast


I absolutely love that the days are getting longer and the weather is (a bit) warmer. It's a nice thought knowing when I get home after work I still have a couple hours of sunlight left to enjoy and there's a slight chance I may be able to get away without wearing a coat in the morning on my way out the door. The first signs of spring always make me feel like the best is yet to come, which for me, means summer. But before I get ahead of myself, there are a handful of hearty recipes I've been dying to share.

Growing up we had plenty of rules in my home, but few were as strictly enforced as the 'no crock pot' rule. I've never really understood why my mom felt so strongly about not owning a slow-cooker, all I know is it meant a childhood devoid of pot roast unless it was eaten at another person's home. To be fair, we ate very well at my house. It's where I learned about nutrition and how to cook, and had plenty of free reign to experiment, but what we didn't eat was pot roast.

I first made this red wine pot roast a couple weeks back, but not knowing how it would turn out, I didn't photograph it at the time. I was tempted to make it again the following day so photos could be taken. But seeing as that I am typically cooking for one, this pot roast was already going to be feeding me for the next week. So when the bf (we'll call him J. on Espresso and Cream, see photo below) decided to come down for the weekend, I knew it was the perfect occasion to make pot roast once again. He grew up on a cattle farm. Could it be any more appropriate?

(Not only does he eat my pot roast, he also patiently reads the paper on Saturday morning)

Pot roast is one of the easiest meals to make. 'Set it and forget it' was coined for this dish. Since I don't yet own a slow cooker, I've improvised with a covered baking dish in the oven at a low temperature. Using a large covered pot, set to simmer, on the stove top for the same amount of time would also work. Therein lies the beauty: it's versatile, adaptable, nearly impossible to mess up, not to mention irresistible.

In my opinion, red wine is indispensable in the kitchen, more specifically pot roast. Don't skimp on this part. I'm not saying you need to go out and buy a $20 bottle of wine, but do try and avoid cooking wine versions you can buy at the supermarket. These wines usually have more salt and less flavor. There are plenty of great red wines available in the $7-$15 dollar range. (if you would like a guide, click here) If you must pass on using red wine, substitute an equal amount of low-sodium beef broth.


Ingredients:
*1 (2.5 lb. - 4 lb.) chuck roast
*1 tsp. kosher salt (or 1/2 tsp. regular salt)
*2 cups red wine
*1/4 cup soy sauce
*1 tsp. Italian seasoning

Instructions:
*Preheat oven to 3oo*F.
*Sprinkle the 1 tsp. salt on the chuck roast. Place the roast in a baking dish that has a lid. Pour in the red wine, followed by the soy sauce. Sprinkle the roast with the Italian seasoning.
*Place the lid on top of the roast. Put the roast in the oven and leave it be for 5 hours. Do not remove the lid or check on it. Just put it in and let it be, it's that easy. After 5 hours, check on the roast. It should fall apart easily with a fork. If it isn't falling apart yet, return it to the oven, covered, until it does.


Happy Cooking!

Madison

Wednesday, March 3, 2010

Almond Citrus Olive Oil Cake and a Winner

Thank you to everyone who entered the Everyday Food giveaway! It was great to hear from so many of you and your e-mails truly made my day. Thanks to random.org, the randomly-generated winner is: Karen Rau! I look forward to hosting more giveaways in the future, so check back for a chance to win.

Now back to your regularly scheduled posting:

I am a creature of habit, I think most of us are, so it suits me just fine that each of my weekday mornings start off the same. Wake up. Start the coffee pot. Put in my contacts. Turn on the Today Show. Drink coffee. Read
Food News Journal. Eat breakfast. Get ready. Go to work.

This morning was just like every other morning, until I stumbled across this article, which left me feeling more than a bit annoyed because it touched on one of the things I like least about the food world: "food trends." Shouldn't really good food be timeless? But here's the real kicker, the article goes on to say that not only are 'we going to be eating more rabbit' in the year to come, but 'olive oil is out in place of other oils.'

With that said, I give you Almond Citrus Olive Oil Cake. For the last few weeks I've been searching for a simple, humble, no-fuss olive oil cake recipe, which proved a lot harder than I'd imagined. One recipe even instructed cooks to grind your own almond flour and boil and process citrus rind to make a citrus paste for the batter. Really? Who would have guessed a simple single-layer olive oil cake without frosting could be so complicated.

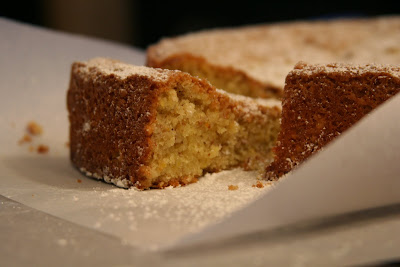
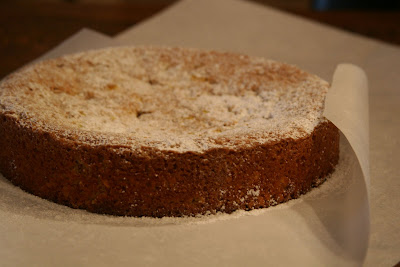
I finally came across a recipe from Giada De Laurentis, and boy is it something. This cake is modest and understated. It probably won't win any awards for showmanship. But its flavor and texture most surely will win over everyone you share it with. The outside is crisp, and slightly chewy, while the inside is golden and spongy, with an every-so-slightly gooey center.

When I made it, the center fell slightly towards the end of baking. If it happens to you, I wouldn't stress. Do not, however, forget to line the bottom of the pan with parchment paper. Without it the cake will stick to the bottom of the pan, leaving you frustrated. Trust me. I kept it simple and just dusted it with powdered sugar, but a dollop of whipped cream or a smear of fruit preserves would be a nice addition.

Ingredients: (my adaptations in parenthesis)
From: Giada De Laurentis | Everyday Italian

1 1/2 cups all-purpose flour
2 teaspoons baking powder
1/2 teaspoon salt
1 cup sugar
3 large eggs
2 teaspoons orange zest (I used tangelos)
2 teaspoons lemon zest
1/4 cup whole milk (I used 2% and it turned out just fine)
3/4 cup extra-virgin olive oil (I used medium-bodied extra virgin olive oil)
2/3 cup sliced almonds, toasted, coarsely crumbled (I processed them in a food processor to get a coarse crumb texture)
Powdered sugar, for sifting

Instructions:

To make the cake: Preheat the oven to 350 degrees F. Lightly oil an 8-inch-diameter cake pan. Line the bottom with parchment paper.

Whisk the flour, baking powder, and salt in a medium bowl to blend. Using an electric mixer, beat the sugar, eggs, and zests in a large bowl until pale and fluffy. Beat in the milk. Gradually beat in the oil.

Add the flour mixture and stir just until blended. Stir in the almonds. Transfer the batter to the prepared pan. Bake until a tester inserted into the center of the cake comes out with moist crumbs attached, about 35 minutes.

Transfer to a rack and cool for 15 minutes. Remove cake and place on serving platter.

Happy Baking!

Madison

Monday, March 1, 2010

Meatball Monday and a Giveaway!


Without a doubt, Monday is not my favorite day of the week. I almost feel bad for Monday, because it's probably the most dreaded day of the whole week. So to perk up the week, I'm starting it off with a plate of meatballs and a giveaway!

First up, the meatballs.
Blogging, I've come to realize, makes you a crazy person. What else would motivate someone to wake up and start making meatballs at 6:30 in the morning? Sure, I could have done this last night before bed, but is it any less crazy to make meatballs at 11 p.m.? By rolling these little bites of happiness in flour before adding them to the skillet, a tip I learned from The Pioneer Woman, you get a great crispy outside. And finishing it off by cooking the meatballs in the skillet with the pasta sauce and red wine imparts tenderness and great flavor the both the meatballs and the sauce.

Second, the giveaway! As a thank you to all my wonderful readers and to start off the week on a good note, I will be giving away a year's subscription to Martha Stewart's Everyday Food magazine. If you haven't checked out this little mag, you should! It's filled with fun, fast recipes, and the smaller size is perfect for taking along when grocery shopping.

To be entered for a chance to win, send me an e-mail (madisonjanemayberry@gmail.com) with the word 'Giveaway' in the subject line and your name in the body of the e-mail by Wednesday, March, 3rd, at 7 p.m. I will randomly select a winner and announce it here on Thursday, so get e-mailing!


Ingredients:
*2 slices sandwich bread, ripped into small pieces
*1/4 cup milk

*1 lb. ground meat (turkey, beef, chicken, pork or a combination of your choice)

*1 egg

*2 Tbsp. red wine (may substitute grape juice or chicken/beef broth of desired)

*1 tsp. kosher salt (or 1/2 tsp. regular salt)

*1/4 tsp. black pepper
*1 Tbsp. Italian seasoning
*1/4 cup flour

*4 Tbsp. olive oil

*1 (24-oz.) jar pasta sauce

*1 cup red wine (may substitute low-sodium chicken/beef broth if desired)


Instructions:

*In small bowl, mix together bread and milk. Set aside.
*In large bowl, combine ground meat, egg, 2 Tbsp. red wine, salt, pepper, and Italian seasoning. Mix with hands until ingredients are well combined. Form meat mixture into 18-24 balls. Roll each meatball in the 1/4 cup flour to coat.
*In large skillet (choose one that has a lid for later) heat 2 Tbsp. olive oil over medium heat. Add half the meatballs to skillet and cook, 3 minutes per side or until golden brown on both sides. Remove meatballs from the skillet and transfer to a plate. (Note: meatballs will not be cooked through at this point.) Add 2 Tbsp. more olive oil to skillet and cook remaining meatballs as before. Transfer second batch of meatballs to plate with first half.
*Add pasta sauce and red wine (or broth) to skillet; stir to combine. Add meatballs to skillet. Cover and cook, over medium low heat, 10 minutes, or until meatballs are cooked completely through. Remove from heat. Serve over pasta and top with Parmesan cheese.


Happy Cooking!


Madison
Related Posts Plugin for WordPress, Blogger...