Saturday, May 29, 2010

One-Bowl Blackberry Cake

If ever there was such a thing as a 'breakfast cake' this, my friends, would be it. And if there was such a thing as a 'perfect for every occasion' cake, this would also be it. Time and time again I have made this humble dessert: for brunches, breakfasts, coffee dates, and dinner parties. And every time it comes through for me - the knight-in-shining-armor of cakes. It wins extra points for having a very basic ingredient list, for not being temperamental and coming together in one bowl with a spoon or fork, no mixer required

And if that wasn't enough to make you love it, this little beauty continues to impress when you put fork to cake to mouth. It's light and pleasantly sweet, contrasting nicely with the tanginess of the berries. A dusting of sugar before baking becomes a crisp crust, transformed by the heat of the oven. When serving this cake for dessert or a decadent brunch item, I drizzle a simple glaze made of powdered sugar and milk over the cake while it is still warm, though it's beautiful and plenty sweet without, too. Depending on the season and my mood, I substitute berries of all types and have had equally great success when substituting whole wheat flour for the all-purpose kind. 

As much as I love variety, change, and experimenting with new recipes, there are times when having a reliable, delicious recipe like this one is all kinds of necessary. A recipe that can be whipped together in a moment's notice for impromptu guests or when the recipe you were planning on making totally flopped. If you stop by for brunch, coffee, or dessert, I'll probably serve you this cake. And if you're lucky, I'll send the leftovers home with you, too. That is, if there are any leftovers to be had. 
 

One-Bowl Blackberry Cake
Ingredients:
*1 cup all-purpose flour
*1/2 tsp. baking powder
*1/2 tsp. baking soda
*1/4 tsp. salt
*2/3 cup sugar (plus 1 1/2 Tbsp. extra for top)
*1/2 stick (4 Tbsp.) butter, melted
*1 large egg
*1/2 cup milk (I use 2%)
*1 tsp. almond extract
*1 tsp. lemon juice
*1 cup fresh blackberries 

Instructions:
*Preheat oven to 400*F. Butter and flour a 9-inch cake pan (I used a 10-inch tart pan, which worked nice, too). 
*In a large bowl, combine the flour, baking powder, baking soda, salt, and sugar. 
*Add the melted butter, egg, milk, almond extract, and lemon juice to the bowl and stir (by hand) until ingredients are well-combined and batter is smooth.
*Pour batter into the cake pan. Top with the blackberries and sprinkle the top of the cake with 1 1/2 Tbsp. sugar. 
*Bake for 20 to 25 minutes, until a wooden pick comes out clean when inserted into the center. (For the 10-inch tart pan, bake 18-20 minutes.) Cool on wire rack.

Happy Baking!

Madison

Wednesday, May 26, 2010

Broccoli-Raisin Salad


After three days of blistering hot and humid weather, I'm convinced Iowans are a very discontent group of individuals. Weather here is hardly ever deemed pleasant or even satisfactory,which I believe is a combination of outlook and cold hard facts. It seems Iowa is a bit of an extremist state in matters of the weather. My two favorite seasons, spring and fall, get only slight acknowledgment because Iowa prefers to vacillate between the dead of winter and the peak of summer. Being half Floridian, I hardly mind the occasional humid day; in fact it makes me feel at home, but I have yet to find another Iowan who shares my enthusiasm for humidity. 

So even though the calendar is telling me it's still weeks away the weather tells me summer is here to stay. The soup I was planning to make has been shelved and the recipes using winter squash but a distant memory. Instead my mind and my tastes have switched to lighter fare, summer food, and I couldn't be more excited. 
Like many during the summer, my appetite changes when warm weather comes knocking at the door. I am not saying my appetite goes missing (I always want to eat!). It's more the what of eating that changes. This salad, for example, is the epitome of summer eating Espresso and Cream style. Light and bright, sweet and salty. Served cold. With raisins for sweetness, broccoli and walnuts for crunch, and feta cheese for, well, overall deliciousness and salty contrast this salad hits the spot. I'll leave it at that.

In case you need a reminder, mayonnaise and I have a bit of a strained relationship and for a long time I thought I didn't like pasta or veggie salads - that is, until I started making them myself. Substituting Greek yogurt for what would normally be mayonnaise is an easy, healthy swap, measuring cup-for-cup like mayonnaise but with fewer calories and loads of protein. If, however, mayonnaise happens to be your thing, the bread-and-butter of your salad eating existence, then by all means use mayonnaise, because life is too short to not eat what you love.

Broccoli-Raisin Salad 
Ingredients:
*5 to 6 cups broccoli florets
*1 (7-oz.) container 2% Greek Yogurt (may substitute mayonnaise if desired)
*1/4 cup olive oil
*1 tsp. kosher salt (or 1/2 tsp. regular table salt)
*1 tsp. cumin
*2 Tbsp. honey mustard
*2 Tbsp. lemon juice
*1/4 tsp. black pepper
*3/4 cup raisins
*1/2 cup chopped walnuts
*4 oz. crumbled feta cheese

Instructions:
*Place broccoli in a large saucepan with 3 cups of salted water. Bring to boiling and cook for 3 minutes. Remove from stove top and strain. Run cold water over the broccoli and strain again to stop the cooking process. Transfer broccoli to a large bowl and set aside.
*Whisk together the Greek yogurt, olive oil, salt, cumin, honey mustard, lemon juice, and black pepper.
*Add the raisins, walnuts, and feta cheese to the bowl with the broccoli. Drizzle the dressing on top of the broccoli mixture and toss to coat evenly. Serve cold.

Happy Cooking!

Madison

Tuesday, May 25, 2010

Homemade Oreos


Whew. Two days after graduation, three loads of laundry, four bags of groceries, one day of work, and two deliriously wonderful nights of sleep later I think I've finally recovered from a crazy-lovely graduation weekend up in Minneapolis. And yes, that guy I talk about quite a bit on Espresso and Cream graduated, with honors and a job! (excuse my bragging, I'm just a bit proud) And because I enjoy looking at other people's photos on the blogs I follow, here is a little snippet from graduation. 


Part two of the sandwich cookie series comes back to the original, or at least the most famous, mass-produced sandwich cookie. I hardly think I need to go into detail about what makes an Oreo so beloved. It's crispy on the outside, creamy inside, and brings together the very classic combination of vanilla and chocolate. 

My greatest complaint with purchased Oreos is the lack of filling. Even the double stuffed variety just isn't quite enough. I want to sit down with a glass of milk, split apart my cookie, and see lots of white cream waiting to be dipped. And since they have yet to roll out a triple stuffed Oreo, I am making my own. 

Like the original, they are crispy, creamy, and make your teeth black with chocolaty goodness, but they taste a little bit more real and a whole lot more special. For everyday, store-bought Oreos will do just fine, but get a group together for a dinner party and serve them Oreos from the package for dessert and they may look at you a little funny. Serve them homemade Oreos and a scoop of vanilla ice cream and you have yourself a dessert that is familiar yet unexpected.


Ingredients:
Homemade Oreos
Adapted from Retro Desserts from Wayne Brachman via Smitten Kitchen 
(Printable Recipe)
Ingredients:
Cookies
1 1/4 cups all-purpose flour
1/2 cup unsweetened cocoa powder 
1 teaspoon baking soda
1/4 teaspoon baking powder
1/4 teaspoon salt
1 1/4 cup sugar
10 Tbsp. (1 1/4 sticks) unsalted butter, softened
1 large egg
2 tsp. vanilla extract  

Filling
1/4 cup unsalted butter, softened
1/4 cup shortening
2 cups powdered sugar
1 teaspoon vanilla extract
1 Tbsp. milk

Instructions:
*Set two racks in the middle of the oven. Preheat to 350°F.
*In a food processor, or bowl of an electric mixer, thoroughly mix the flour, cocoa powder, baking soda and powder, salt, and sugar. While pulsing, or on low speed, add the butter, and then the egg. Continue processing or mixing until dough comes together in a mass.
*Transfer dough to a lightly-floured surface. Use a rolling pin to roll the dough to a 1/2-inch thickness. Using a cookie cutter (I used a flower-shaped cutter) slice cookies and place on baking sheet. Bake for 7 minutes, until lightly golden around the edges. Cool 2 minutes on baking sheet, then transfer to cooling rack and cool completely.

*To make the cream, place butter and shortening in a mixing bowl, and at low speed, gradually beat in the sugar, vanilla, and milk. Turn the mixer on high and beat for 2 to 3 minutes until filling is light and fluffy.
*To assemble the cookies, in a pastry bag with a 1/2 inch, round tip, (I just used a zip lock bag with the end snipped off) pipe teaspoon-size blobs of cream into the center of one cookie. Place another cookie, equal in size to the first, on top of the cream. Lightly press, to work the filling evenly to the outsides of the cookie. Continue this process until all the cookies have been sandwiched with cream.

Happy Baking!

Madison

Sunday, May 23, 2010

Almond Sandwich Cookies

At this moment, I would love nothing more than to write words beautiful enough to do these cookies justice, but right now the only words coming to my head are exhaustion and sleep-deprivation. Graduation weekends and the celebration of new beginnings and memories past bring about excitement, sadness, joy, and pure lack of sleep. This weekend J. graduated from college and today I managed to sneak away to a coffee shop so I could stop, and breathe, and take a minute to think about something as simple and beautiful as a light almond sandwich cookie filled with cream.

Consider this recipe part one of a two part series - a contrast of sorts in light and dark. Last week I played with two versions of what started out as a homemade Oreo. Much like the Homemade Pop Tarts of a few weeks back, there is something incredibly fun and nostalgic about making your own version of a treat you've been eating from the package since childhood. Part of the beauty is the ability to customize in whatever way you see fit. Me? I'm a vanilla sort of girl. 

So in this case, my version of a homemade Oreo takes the form of Almond Sandwich Cookies. These cookies are light, crispy, and incredibly sweet, especially when filled with an Oreo-like cream, so proceed with caution when making them. I found one of my smallest cookie cutters was the perfect size, allowing me to finish a cook in no more than a couple bites. And for both taste and nostalgic value, always serve with a glass of milk.


 Almond Sandwich Cookies
Adapted from Retro Desserts from Wayne Brachman via Smitten Kitchen
(Printable Recipe)
Ingredients:
Cookies
1 3/4 cups all-purpose flour
1 teaspoon baking soda
1/4 teaspoon baking powder
1/4 teaspoon salt
1 1/4 cup sugar
10 Tbsp. (1 1/4 sticks) unsalted butter, softened
1 large egg
2 tsp. almond extract 

Filling
1/4 cup unsalted butter, softened
1/4 cup shortening
2 cups powdered sugar
1 teaspoon almond extract
1 Tbsp. milk

Instructions:
*Set two racks in the middle of the oven. Preheat to 350°F.
*In a food processor, or bowl of an electric mixer, thoroughly mix the flour, baking soda and powder, salt, and sugar. While pulsing, or on low speed, add the butter, and then the egg. Continue processing or mixing until dough comes together in a mass.
*Transfer dough to a lightly-floured surface. Use a rolling pin to roll the dough to a 1/2-inch thickness. Using a cookie cutter (I used a flower-shaped cutter) slice cookies and place on baking sheet. Bake for 7 minutes, until lightly golden around the edges. Cool 2 minutes on baking sheet, then transfer to cooling rack and cool completely.

*To make the cream, place butter and shortening in a mixing bowl, and at low speed, gradually beat in the sugar, almond extract, and milk. Turn the mixer on high and beat for 2 to 3 minutes until filling is light and fluffy.
*To assemble the cookies, in a pastry bag with a 1/2 inch, round tip, (I just used a zip lock bag with the end snipped off) pipe teaspoon-size blobs of cream into the center of one cookie. Place another cookie, equal in size to the first, on top of the cream. Lightly press, to work the filling evenly to the outsides of the cookie. Continue this process until all the cookies have been sandwiched with cream.

Happy Baking!

Madison

Wednesday, May 19, 2010

Strawberry-Rhubarb Cobbler


Working at a magazine devoted to home and family, I think I fit in pretty well. I love my family, dabble in home (er, apartment) decorating and design, and it's no surprise food gets me going. But truth be told, I've never even really had the desire to grow anything, especially when I can run down to the farmer's market on a Saturday morning and return with a bounty of reasonably priced local produce - no weeding required.  That is, until I was home last weekend and developed a hint of longing for a small garden of sorts. Or in the case of my yard at home, just a few healthy rhubarb plants, sprouting like clockwork every year around this time.

I returned to my apartment Monday morning, suitcase and a big bunch of freshly-cut rhubarb in tow, excited about my loot but unsure what I wanted to make. Rhubarb bread was tossed around for a while, followed by the idea of making rhubarb sauce. But since J. tells me his mom makes a fabulous rhubarb sauce and I've never made any, I figured some things are best left untouched. Instead I settled on the classic combo of strawberry and rhubarb in the form of a cobbler.


Cobblers epitomize everything great about fruit desserts; they are sweet, simple, and light enough to eat even during the warmest days of summer. They pair nicely with ice cream and are easily adaptable for whatever fruit is in season. But no matter how great the fruit below may be, the bread and butter of a cobbler lies in the topping.

In my mind a good cobbler topping must be substantial, crispy, sweet and toasty - like eating an oatmeal cookie only to discover an equally delicious fruity delight underneath. This cobbler is best when eaten warm and straight from the oven, or within a day of baking. And if you are lucky enough to have any cobbler left over, it makes a delicious, indulgent breakfast when served alongside a scoop of yogurt and a cup of good, strong coffee.

Strawberry-Rhubarb Cobbler
(Printable Recipe)
Ingredients:
Filling
*3 cups rhubarb, chopped
*1 lb. straberries, sliced
*1/2 cup sugar
*1/4 cup all-purpose flour
*1 Tbsp. strawberry gelatin
Topping
*1 cup all-purpose flour
*1/2 cup sugar
*1 cup rolled oats
*1/2 cup chopped pecans
*1 tsp. ground cinnamon
*1/4 tsp. nutmeg
*1/2 tsp. salt
*1 tsp. baking soda
*1 stick of butter, melted
*1 large egg

Instructions:
*Preheat oven to 350*F. Lightly grease a 9- to 10-inch pie plate. Set aside.
*In a large bowl, toss together the rhubarb, strawberries, sugar, flour, and strawberry gelatin. Pour the strawberry-rhubarb mixture into the pie plate and spread into an even layer.
*In another bowl, combine the flour, sugar, oats, pecans, cinnamon, nutmeg, salt, and baking soda and stir until evenly combined.
*Add the butter and egg to the dry ingredients and stir until dry and wet ingredients are well combined.
*With your fingers, crumble the topping over the fruit. Place the cobbler in the oven and bake for 35 to 40 minutes, until filling is bubbly and topping is set and slightly golden. Cool for 5 to 10 minutes. Best is served warm or within one day of baking.

Happy Baking!

Madison

Tuesday, May 18, 2010

Banana Bread Ultimate


I feel a little bad for banana bread sometimes. Sure, it's delicious beyond measure and versatile, going easily from morning to night. But very rarely does anyone set out to make banana bread. Instead, banana bread has been reduced to an afterthought. Have old bananas on hand that are too old for the lunchbox or morning cereal? Make banana bread.

This recipe might change the way you approach banana bread. You might even find yourself going to the store, in search of bananas on the verge of going to mush, for the sole purpose of making banana bread, because this recipe is pure yumm. Trust me, I did the research this weekend and the feedback was all kinds of positive. 

But this banana bread also has a dirty little secret. It's made with 100% whole wheat flour. When is she going to shut up about whole wheat flour? You're probably thinking, but I just can't seem to find it in me to shut my mouth, because when a recipe finds that happy place where it is soft, moist, delicious, and 100% whole wheat, you know you've got something good on your hands and your hips.

 
Banana Bread Ultimate
Ingredients:
*1 cup sugar
*1 stick unsalted butter, softened
*2 large eggs
*3 ripe bananas, mashed
*2 Tablespoons milk
*1 tsp. vanilla extract
*1 1/2 teaspoons ground cinnamon
*2 cups whole wheat flour
*1 teaspoon baking powder
*1 teaspoon baking soda
*1 teaspoon salt
*3/4 cup chopped pecans 

Instructions:
*Preheat the oven to 325*F. Butter a 9 x 5 x 3 inch loaf pan. Line the bottom of the loaf pan with a slice of parchment paper to avoid sticking.
*Beat the sugar and butter in a large mixing bowl until light and fluffy, about 2 to 3 minutes. Add the eggs one at a time, beating well after each addition.
*In a small bowl, mix together the bananas, milk, vanilla, and cinnamon. In another bowl, mix together the flour, baking powder, baking soda and salt.
*Add the banana mixture to the butter/sugar mixture and stir until combined. Add dry ingredients, mixing just until flour disappears.
*Beat in the chopped pecans by hand.
*Pour batter into pan and bake 1 hour to 1 hour 10 minutes, until a toothpick inserted in the center comes out clean. Set aside to cool on a rack for 15 minutes. Remove bread from pan, invert onto rack and cool completely before slicing.

Happy Baking!

Madison

Sunday, May 16, 2010

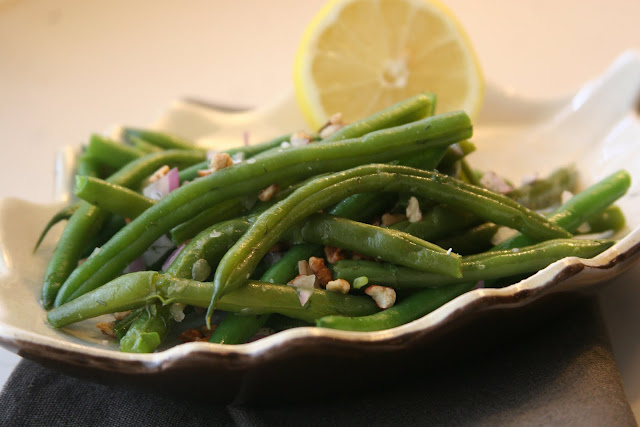
Green Bean Summer Salad


Being at home in the kitchen is always so inspiring, opening up my mind to simple dishes I might not have thought of putting together myself. Until just a couple hours ago, I had fully planned on posting an entirely different recipe, but while I was sitting at the kitchen table, putting together a post, my mom was in the kitchen, chopping and drizzling, and tossing. And I, as usual, got my fingers into what she was making for the neighborhood potluck. Lucky for me, my mom was willing to share both the recipe and an extra helping of this Green Bean Summer Salad.  


Preparing the green beans properly is the most important element of a successful green bean salad. Say it with me, "I promise not to overcook my green beans." Overcooking is one of the biggest mistakes made when preparing vegetables. Just a short bath in boiling water is enough for most vegetables to achieve a crisp-tender quality, meaning they are cooked to a point where they still retain some of the crunchiness of raw vegetables; think of it as a middle ground between fully cooked and raw.

I'm pretty positive I would have eaten the entire bowl of this salad had my mom let me instead of whisking it away to the neighborhood potluck. Crunchy, sweet roasted pecans and savory bits of onion tossed in a light lemon-dill dressing makes for one heck of a summer salad. I often neglect lemon when cooking. Big mistake, since adding lemon to this salad is like a little burst of sunshine making every other flavor better, brighter, more prominent. Now that I have this salad all I need is a potluck!


Green Bean Summer Salad
(Printable Recipe)
Ingredients:
*1/2 cup chopped pecans 
*1 1/2 lbs. green beans, trimmed
*1/2 a medium onion, finely chopped
*1/4 cup olive oil
*Juice from 1/2 a lemon
*1/2 tsp. dried dill
*1 to 1 1/2 tsp. kosher salt
*1/2 tsp. black pepper

Instructions:
*Preheat oven to 350*F.
*Place pecans on a baking pan or oven-going baking dish and toast in the oven for 5 minutes. Remove from oven and cool slightly. Set aside.
*Place green beans in a large saucepan and add enough water to come about halfway up the green beans. Bring to boiling and cook 5 minutes, or until green beans are crisp-tender, meaning they still have some crunch to them, but are pleasantly tender. Drain beans and place in a large bowl.
*Add the toasted pecans and chopped onions to the bowl.
*In a small bowl, combine the olive oil, lemon juice, dill, salt, and pepper.
*Drizzle the olive oil mixture over the green beans and toss to coat. Serve immediately at room temperature, or refrigerate up to a day and serve chilled.

Happy Cooking!

Madison

Friday, May 14, 2010

Veggie-Lovers Pesto Pizza


Looking back at my childhood and thinking about the food my mom put on the table each night continually blows me away. Not because the food required complicated cooking methods or multiple-step preparation, but because it was real. Biscuits didn't come from a can, but from a mixingbowl, beef stew not in a can but from the magical process of stewing beef, potatoes, and carrots. And pizza could be found in the oven in imperfect shapes and layered with homemade goodness. Maybe it's selective memory, only proving food made from scratch is the most memorable kind.


I tend to get a little fired up about the topic of cooking, namely the importance of home cooking and teaching people to cook. Which is why I love food blogging and this little space on the internet where I can cook, share, and hopefully encourage others to get in the kitchen, too.

Since I'm taking a little trip home this weekend, eating and cleaning out my fridge was a priority. I knew immediately it was a pizza-loaded-with-ingredients kind of night. So while I let the dough rise, I got to digging through my fridge and chopping up whatever I found. Which so happened to be....
*Pesto
*Shitake Mushrooms
*Shallots
*Arugula
*Cheese
*Asparagus

Knowing that every fridge, and person, is different, I would encourage you to take the toppings I used as a guide, rather than a rule. If you happen to hate mushrooms, substitute ground beef. Swap out the asparagus for zucchini or yellow squash, and the arugula for spinach. 

But if you do decide to follow this recipe exactly, I promise you will not be disappointed. The pesto serves as your flavor-enhancing secret weapon and loading it up with veggies makes it more filling and a bit easier to stop after a slice or two. Topping the baked pizza with fresh greens tossed in a simple vinaigrette is my favorite finishing touch; it seems only natural to eat salad on top of your pizza, since pizza with salad is already a classic. 

Veggie-Lovers Pesto Pizza
(Printable Recipe) 
Ingredients:
Crust
*1 cup hot water
*1 (1/4-oz.) package active dry yeast
*1 tsp. sugar
*1 tsp. table salt
*2 1/4-1/2 cups all-purpose flour
*1 Tbsp. olive oil
Toppings
*1/3 cup pesto
*1 1/2 cups shredded Manchego cheese (mozzarella can be substituted)
*1 shallot, thinly sliced or 1/2 a medium red onion, thinly sliced
*1/3 cup olives, chopped
*1/2 of a bunch of asparagus, chopped (about 1 cup)
*1 cup shitake mushrooms, sliced
*2 cups arugula or spinach
*1 Tbsp. olive oil
*1 Tbsp. balsamic vinegar
*1/2 tsp. kosher salt

Instructions:
*Preheat oven to 400*F.
*In large mixing bowl, combine the hot water, yeast, sugar, and salt. Stir until all ingredients are disolved, about 30 seconds. Allow mixture to rest 5 minutes.
*Stir in 1 cup of the flour and mix until well combined. Stir in the second cup of flour. Knead the final 1/4 to 1/2 cup of flour in with your hands, until dough is still soft, but not sticky. Form into a ball and place in a clean bowl. Drizzle the dough with the 1 Tbsp. of olive oil. Cover with a towel and place the bowl in a warm place. (I like to crack the door of the oven for this and let the dough rise on the stove top where the warm draft can reach it) Allow dough to rise until it has doubled in size, about 30 minutes.


*Once dough has risen, transfer the dough to a baking sheet and press into a rectangle, about 12x8-inches in size.
*Spread the pesto on top of the dough, followed by the cheese. Top with the shallot, olives, asparagus, and mushrooms.
*Bake for 15-20 minutes, until bottom of crust is golden brown and the toppings are lightly browned and bubbly.
*White pizza is baking, toss together the arugula or spinach, olive oil, balsamic vinegar, and salt.
*Top baked pizza with the fresh arugula mixture. Cut into slices and enjoy!


Happy Cooking!

Madison

Wednesday, May 12, 2010

Fingerling Potato Salad


Summer is just around the corner, or at least that's what my calendar keeps telling me. But if you took a trip to my neck of the woods, I'm convinced you would agree with me when I say it feels much more like October than the middle of May. As far as states go, Iowa is the biggest tease of all. Hot, cold, rainy, sunny. Heck, it wouldn't surprise me if it starting snowing tonight. 

In response to this cold and rainy weather, I'm staging a protest against all things cold weather related (except black tights, which I begrudgingly wore to work today). Instead, I'm filling my kitchen with warm weather foods, like this potato salad, made with all sorts of yummy ingredients like basil, honey mustard, Parmesan, and olive oil.

I love the color contribution the purple fingerling potatoes make to this dish - even if the color has no impact on taste. Though I don't normally have fingerling potatoes in my kitchen, these little beauties fell into my lap (one of the many perks of my job) and I have been itching for a reason to use them ever since. If you don't have fingerling potatoes on hand, can't find them, or don't want to drop the extra cash to buy them, any small potato would work as a substitute. And since I am not big on drowning summer salads in mayonnaise, I've made this potato salad olive oil-based. Perfect for summer barbecues, or rainy May days in Iowa. 

Fingerling Potato Salad
Ingredients:
*1 1/2 lbs. fingerling potatoes, or other small potato variety
*1 Tbsp. cider vinegar
*1 tsp. kosher salt
*1 cup fresh basil leaves
*1 Tbsp. lime juice
*1/3 cup olive oil
*2 Tbsp. grated Parmesan cheese
*2 Tbsp. honey mustard
*2 Tbsp. Greek yogurt or mayonnaise
Additional kosher salt and black pepper

Instructions:
*Place potatoes in a large pot with enough salted water to fully cover the potatoes. Bring water to boiling and continue to cook potatoes for 10 to 15 minutes, until fork tender. Transfer potatoes to a strainer and rinse with cold water to stop the cooking process.
*Transfer strained potatoes to a large zip top bag with the cider vinegar and kosher salt. Shake to evenly coat and refrigerate for at least 1 hour, up to one day.
*Meanwhile, prepare the dressing. In a food processor or blender, combine the basil leaves, lime juice, olive oil, Parmesan cheese, honey mustard, and Greek yogurt or mayonnaise. Process or blend until creamy.
*Place the refrigerated potatoes in the food processor, with the dressing, and pulse until potatoes are coarsely chopped but not blended. Transfer to serving bowl and sprinkle with salt and black pepper.

Happy Cooking!

Madison

Tuesday, May 11, 2010

Pecan-Cinnamon Oatmeal Pancakes


I am what you might consider one of those annoying people who likes getting up early, with the exception of some Saturday mornings when I sleep in until (gasp!) eight or nine, I'm usually up and at it around seven. And being a morning person, there is nothing I love more than a good breakfast or morning ritual. Sure, I have my own morning rituals at home, but it's when I am up in Minneapolis/St. Paul visiting J. and my best friend, Emily, among others, that I take part in my favorite morning ritual of all - breakfast at The Good Earth.

Being a creature of habit, I order the same thing every time - ten grain hotcakes served with a side of peanut butter. And despite my best efforts, I have yet to find something similar here in Des Moines, or anywhere else for that matter. They are crunchy, dense, and fulfilling in a way regular pancakes could only dream of being, and while these pecan-cinnamon oatmeal pancakes aren't a replacement for my ten grain hotcakes, they certainly are a step in the very-right direction.

This past weekend my mom commented on how much she loves pancakes, and thanks to the very timely Deb of The Smitten Kitchen, who posted a recipe for oatmeal pancakes just last week, I felt eager to put my own twist on the recipe for Mother's Day breakfast. These little hotcakes are pure gold. Despite being made with whole wheat flour and oatmeal, they don't seem overly dense, just enough to fill you up for hours to come, and the cinnamon, vanilla, and pecan flavors mask their underlying healthfulness. "Gosh these are filling," said my mom. "You should let your readers know that they probably won't be able to eat more than one!"

 My mom captured this candid moment, for those of you who ever wonder 
what blogging looks like behind the scenes at my apartment.


Pecan Cinnamon Oatmeal Pancakes
Recipe adapted from Deb of The Smitten Kitchen via Good to the Grain cookbook
Ingredients:
*3/4 cup oat flour (you can make this by pulsing rolled oats into a food processor or spice grinder until finely ground; 1 cup of oats yielded 3/4 cup oat flour for me)
*1 cup all-purpose or whole wheat flour (I used whole wheat)
*2 tablespoons sugar
*2 teaspoon baking powder
*3/4 teaspoon Kosher or coarse salt
*3 tablespoons unsalted butter, melted and cooled slightly (plus extra for the pan)
*1 1/4 cups whole milk
*1 cup cooked oatmeal (To make: 1/2 cup uncooked, microwaved for 2 minutes with 1 cup water)
*2 large eggs
*1 tsp. vanilla extract
*1 tsp. ground cinnamon
*1 cup chopped pecans
(Fruit preserves or maple syrup, if desired) 

Instructions:
*Whisk the dry ingredients (oat flour, flour, sugar, baking powder and salt) together in a large bowl.
*In a smaller bowl, whisk the butter, milk, cooked oatmeal, eggs, vanilla, and cinnamon together until well combined.
*Gently stir the wet ingredients into the dry ingredients. It is okay, even good, if the batter is slightly lumpy.
*Heat a large skillet or griddle over medium heat until water sizzles when splashed onto the pan. Lower to medium-low. (This helps pancakes cook evenly and avoid burning) Rub the pan generously with butter or spray with non-stick cooking spray.
*Working quickly, dollop 1/4-cup mounds of batter onto the pan, 2 or 3 at a time. Sprinkle batter with some of the chopped pecans. Once bubbles have begun to form on the top side of the pancake, flip the pancake and cook until the bottom is dark golden-brown, about 5 minutes total. Wipe the pan with a cloth before cooking the next pancake. Continue with the rest of the batter.
*Serve the pancakes hot, straight from the skillet or keep them warm in a low oven. We also found these to reheat surprisingly well the next morning, again in a low oven.

Happy Cooking!

Madison

Saturday, May 8, 2010

Whole Wheat No Knead Bread


Despite what we all might want to believe, mothers really do know quite a lot about their children. Just a couple months ago, J. and my mom had dinner together without me, and my own dear mom decided to take it upon herself to share with J. what she thought was my best and worst trait. This happens to be one and the same: "My daughter is impulsive." And boy, let me tell you, this is one time I will admit that she is completely right. For Mother's Day I bought my mom a new carry-on suitcase and, unable to wait, I gave it to her two months early. It wasn't the first time I have given a gift to someone early, unable to contain my excitement. In fact, it happens all the time.

And it happens when I blog, too. Case in point: this whole wheat no knead bread, which I've been dying to share with you all for almost a week. Did you hear that mom? I waited almost a week! On Monday, I baked my first loaf after being inspired by this recipe from the blog London Foodie in New York.

Some time ago, I swore off bread baking because I felt it took too much time and effort, but after last week's nut butter success, I was feeling adventurous, daring, and crafty. So I tackled homemade bread and was blown away by the ease of it all. It's a fabulous combination of lightness and density, which can be tricky with whole wheat bread, and goes great with almost everything. I would be eating a slice for breakfast this morning if the leftover banana pudding trifle in my fridge wasn't calling my name.


Whole What No Knead Bread
Adapted and converted from London Foodie in New York
Ingredients:
*2 cups whole wheat flour
*1/2 + 1/3 cups all-purpose flour
*1 tsp. sugar
*2 tsp. kosher salt (or 1 tsp. table salt)
*2 (1/4-oz.) pkgs. active dry yeast
*2 cups hot (but not boiling) water 
*1 Tbsp. olive oil

Instructions:
*Preheat oven to 400*F.
*In a large mixing bowl, combine the flours, sugar, salt, and yeast. Make a hole in the center of the dry ingredients, and slowly add the water, stirring as you go, until all the dry ingredients are mixed with the water.
*Once it begins to look scraggly and has come together add the oil and mix with your hands. Remove from the bowl and knead a few times just to bring it together.
*Grease and flour a 2-lb. loaf pan. Form the bread dough into a loaf shape, and place in the pan. Brush the top with additional olive oil and sprinkle with salt or Italian seasoning, if desired.
*Cover with a towel and place in a warm location in the kitchen. I like to open my oven door slightly and set the loaf pan on top of the oven so the draft of the warm oven reaches the loaf and helps it rise.
*Let rise for 30 minutes to 1 hour, until it is doubled in size. Place in the oven and bake for 30 minutes. After 30 minutes, remove bread from loaf pan and place directly on oven racks for 10 minutes.
*Cool for at least 10 minutes before slicing. Store tightly covered.

Happy Baking!

Madison

Thursday, May 6, 2010

Banana Pudding Trifle


Before getting to regular posting news, I have an exciting announcement.... Espresso and Cream is losing .blogspot.com and switching to a .com! All that basically means for you all is that when you are searching, typing, or sharing how to find Espresso and Cream you can save yourself the extra effort and type in www.espressoandcream.com. Readers who go to the old .blogspot.com address will automatically be re-directed to the new one, and for the next couple of days if some things aren't functioning properly, you know the reason. By the end of the weekend, everything should be fixed! Thanks in advance for your patience.

Now back to regular posting:

I'm not entirely sure what has come over me lately, but for the past two months I have been waking up craving the most unusual foods. Maybe not unusual to most people, but certainly unusual to me, since most of the foods I suddenly find myself wanting to eat are things I have previously sworn off as foods I hate. But before you get all hot and bothered, I can 100% assure you these cravings have nothing to do with possible impending motherhood (amen!) and a lot more to do with my life as a food editor. 

Growing up there was a whole list of things I wouldn't eat, but as the years passed and I matured, so did my taste buds. What was once a picky eater turned into an adventurous one, and up until college graduation, only a few foods remained on the no-eat list, like pickles, coleslaw, mayonnaise, bananas, gravy, and watermelon.

Unfortunately, I still don't have a taste for watermelon or gravy, but a slow trickle of cravings over the past couple weeks led me to discover that I do, in fact, love pickles and coleslaw, and mayonnaise. Strange but true. And today, at work, I suddenly couldn't figure out why I've gone 22 years without eating banana pudding. With half of my family being southern and having been born in the South, I felt shame and confusion creep over me along with an intense desire to make banana pudding.


Within five minutes of returning home after work this afternoon I was barefoot, in my kitchen, stirring a saucepan of what would be the pudding for my banana pudding trifle. Since I had never made banana pudding, I was shocked to realize that after some intense research on SouthernLiving.com that most 'banana puddings' are really just vanilla puddings with banana slices, which really suited me just fine. And once the whole trifle was assembled and photographed, I dug out two heaping bites, bananas and all, and basked in the deliciousness and satisfaction of being right: I love bananas and above all, banana pudding. 


Banana Pudding Trifle
Courtesy of Southern Living magazine
Pudding:
*3 cups milk (2% or whole)
*3 large eggs
*3/4 cup sugar
*1/3 cup all-purpose flour
*2 Tbsp. butter
*2 tsp. vanilla extract 


*4 medium bananas, sliced
*1 (1-lb.) pkg. peanut butter sandwich cookies (Nutter Butters), coarsely crumbled
*2 cups sweetened whipped cream


Instructions: 
*Whisk together first 4 ingredients in a large saucepan over medium-low heat. Cook, whisking constantly, 15 to 20 minutes or until thickened. (make sure you really do whisk/stir constantly) Remove from heat; stir in butter and vanilla until butter is melted. 
*Pour into a bowl, place a sheet of plastic wrap directly on top of pudding, and refrigerate until cool. 
*When pudding is cooled, in a bowl or trifle dish, pour half of the pudding in the bottom of the dish, followed by half the bananas and half the cookies. Repeat with remaining pudding, bananas, and cookies. Top with the whipped cream and additional cookies, if desired. 


Happy Cooking!

Madison 

Wednesday, May 5, 2010

Whole Wheat Buttermilk Biscuits


Do you ever just miss home? I'm not sure age really matters, because when I think about home it's not the place or the building, it's that feeling and stage in life when you knew that someone else was there to take care of you and have your back. Growing up with divorced parents, I traveled a lot between Iowa and Florida, so getting homesick was rare. Now, living on my own for the first time, I still don't get homesick, but I do miss home every now and again.  


And despite the distance and time that has passed since my years living at home, I am still able to get in the kitchen and capture my childhood with a few simple ingredients, a bowl, and a wooden spoon. (Okay, I used my food processor, too) Food is magical that way. It holds the power to inspire, to transport, to recreate moments and time passed. I think everyone has that special taste of childhood, and for me these buttermilk biscuits are it. 


Things really do come full-circle, because little did I know, my mom's famous biscuits originated from a Better Homes and Gardens New Cookbook circa 1972; Better Homes and Gardens, where I work and write and eat today. So yesterday, when I was missing missing home, I pulled out my own Better Homes and Gardens New Cookbook circa 1950 that I purchased from a flea market this fall and got to making my mom's buttermilk biscuits. And they turned out, just as I remembered - a piece of the familiar when so many things in life are changing around me.

Of course, I couldn't resist making a few small changes. Instead of using all-purpose flour, I used a combination of whole-wheat and all-purpose. And I took out the shortening, because I hardly ever cook with shortening, and used butter in its place. Oh, and I made them a little bigger than the recipe suggests. Back in 1950 this recipe made 12-18 biscuits. In my kitchen, circa 2010, it made 9. So here's to biscuits, and memories, and recreating home in your own kitchen, wherever that may be.

Whole Wheat Buttermilk Biscuits
Adapted from Better Homes and Gardens New Cookbook, 1950
Ingredients:
1 cup all-purpose flour
1 cup whole-wheat flour
1/4 tsp. baking soda
3 tsp. baking powder
6 Tbsp. butter, cut into pats
1 cup buttermilk
1 egg white from a large egg
Additional kosher salt, if desired

Instructions:
*Preheat oven to 450*F.
*Combine the flours, baking soda, baking powder, and salt in the bowl of a food processor or a large bowl (if you are using a pastry blender). Add the butter to the flour mixture and process with a food processor or blend with a pastry blender until mixture resembles coarse crumbs, with small, uneven pieces of butter throughout.
*Stir in the buttermilk until wet and dry ingredients are just combined. Turn out onto a floured surface and roll to a 3/8-inch thickness. Cut into biscuits and place on a lightly greased baking sheet. Brush egg white on the tops of each biscuit and sprinkle with kosher salt. Bake for 12-14 minutes, until lightly golden.
*Serve warm, if possible, with lots and lots of butter and jam. Reheat in the oven if necessary.

Happy Cooking!

Madison

Tuesday, May 4, 2010

Make-Your-Own Nut Butter


 Hi, my name is Madison and I love peanut butter. I also love ketchup, and it's a well-known fact in my extended family, since every time we eat either turkey or ham, I go searching through the fridge of the aunt and uncle's house I am at in search of ketchup to bring to the table.

Unfortunately, this is one duo that does not work well together. Though when J. returned from Europe in January, he did bring me back a chocolate bar that incorporated both. Let's just say I am not going to be trying to sell any of you on that combination any time soon.

But what I really intended to discuss was homemade nut butter. A trip to the peanut butter section of the grocery store will most likely yield some non-peanut butter impostors: soy nut butter, almond butter, mixed-nut butter. They are, of course, impostors in the most wonderful sort of way. Along with the delicious, unusual taste comes an equally unusual and not so delicious price tag. Does anyone really think it's a good idea to shell out $10 (yes, $10!) for a small jar of nut butter? Not this girl, especially when it's so easy to make yourself.

Over the past couple of weeks I've been playing with this recipe, using peanuts, almonds, and walnuts (pictured). I love the taste of walnuts, though if you aren't a walnut-lover to begin with I don't think walnut-butter is going to change your mind. The process is simple, really. And unlike the labor-of-love homemade pop tarts of last week, this nut butter recipe can be completed and consumed in under 12 minutes. Grind up the nuts in a food processor, add a little oil and salt, process some more, and then a little more until you are left with a creamy nut butter better than anything you might buy on the supermarket shelves, for a whole lot less.


Homemade Nut Butter

Ingredients:
*16 oz. (about 4 cups) toasted, unsalted nuts of your choice (I have tried this with almonds, peanuts, pecans, and walnuts and had success with all four, or you could use a combination)
*3 to 4 Tbsp. oil (I used light olive oil)
*1 1/2 tsp. salt (regular, table salt)

Instructions:
*In a food processor, process the nuts for 2-3 minutes, scraping down the sides as needed, until the mixture resembles fine crumbs and becomes slightly pasty.
*Add in the oil and salt. Continue to process for 3-5 minutes more, scraping down the sides frequently, until creamy and smooth, with just a slight texture remaining.
*Refrigerate until ready to use.

Happy Cooking!

Madison

Sunday, May 2, 2010

Magnolia Bakery's Vanilla Cupcakes

The first time I tasted a Magnolia Bakery cupcake was in the fall of 2008 while I was in New York for The Rachael Ray Show. For those not familiar with Magnolia Bakery, it gained wide-spread recognition outside of NYC when Carrie Bradshaw, aka Sarah Jessica Parker, on Sex and the City declared the bakery her favorite place for a mini-cake fix. Being a devoted SATC fan, I was determined to play Carrie Bradshaw for the day (er...5 minutes) despite the cold, wind, and rain.

There are multiple Magnolia locations, but only the original on Bleeker Street would do for me. The shop was little, and unassuming with standing room only and a line outside the door that seemed to shout, "delicious cupcakes inside!" Delicious cupcakes indeed. I can still vividly remember my fist bite while walking and window shopping. The light, fluffy, perfectly balanced vanilla cake with a seriously sweet buttercream had me swooning. And while New Yorkers seem to have very strong opinions on what cupcakes are the best in the city, my outsider's vote goes to Magnolia.

Soon after returning home from New York I Googled the recipe for Magnolia's Vanilla Cupcakes and was shocked and delighted that it was both available online and unblieveably easy. I've been making these cupcakes ever since, to the delight of many. And this week at work I was gifted with something from one of my co-workers: The Magnolia Bakery Cookbook. Reason enough to make a couple dozen cupcakes, even if I have already been making the cupcakes for over a year.

Ingredients:
*1 1/2 cups self-rising flour
*1 1/4 cups all-purpose flour
*1 cup (2 sticks) butter
*2 cups sugar
*4 large eggs
*1 cup milk (I like to use buttermilk)
*1 tsp. vanilla extract

Buttercream Icing:
*1 cup (2 sticks) butter
*7 cups powdered sugar
*1/4 cup milk, cream, or half and half
*2 tsp. vanilla extract (or extract of your choice)

Instructions:
*Preheat oven to 350*F. In a small bowl, combine the flours. Set aside.
*In a large bowl, on the medium speed of an electric mixer, cream the butter until smooth. Add the sugar gradually and beat until fluffy, about 3 minutes. Add the eggs, one at a time, beating well after each addition.
*Add the dry ingredients in three parts, alternating with the milk and vanilla. With each addition, beat until the ingredients are incorporated but do not overbeat. Using a rubber spatula, scrape down the batter in the bowl to make sure the ingredients are well blended. Carefully spoon the batter into the cupcake liners, filling them about two-thirds full. Bake for 20–25 minutes, or until a cake tester inserted in the center of the cupcake comes out clean.

*Cool the cupcakes in the tins for 15 minutes. Remove from the tins and cool completely on a wire rack before icing.

For Buttercream:
*Beat butter until creamy, about 1 minute.
*Add in 4 cups of the powdered sugar and the 1/4 cup milk. Beat on medium high speed for 3-5 minutes until creamy. Add in the remaining powdered sugar and vanilla extract. Beat until all the ingredients are well-combined and buttercream is fluffy and creamy.
*Pipe or spread the buttercream on top of the cupcakes when cupcakes are completely cool. Top with decorator's sugar or sprinkles, if desired.

Happy Baking!
Madison
Related Posts Plugin for WordPress, Blogger...