Sunday, January 31, 2010

Dijon Beans and Greens


There are some scary vegetables out there. You know, the ones you pass by every time you're at the grocery store because you're just not sure what to do with them, or if you're like me, you've been told they just don't taste very good. Case in point? Brussels Sprouts. If we played a little game of word-association when I said "Brussels sprouts," you would probably think, "stinky, green, something mom made me eat before I could have dessert." Am I right?

I, too, was in the stinky-gross-no-thank-you camp until last week. After having passed by the sprouts for a couple weeks now, I caved and bought a bag. They were cheap, neatly packaged, and an unbelievably beautiful shade of green. If they were really as disgusting as I remembered, then it was a $2 mistake I was willing to take. Crazy, I know. Now that I've given Brussels sprouts a second chance, I think it's fair to say that this is a $2 risk worth making again and again.


After cooking the beans, slice them into bit-sized pieces

Speed cooking time and vary texture by halving and slicing the sprouts

Heat the oil and add the sprouts


Cook the sprouts 5-7 minutes, until they are softened and slightly brown

Add the green beans to the skillet after cooking the sprouts

Ingredients:
*1/2 - 3/4 lb. fresh green beans, trimmed
*6 Brussels Sprouts
*2 cloves garlic, sliced (optional)
*1 Tbsp. olive oil
*1/2 tsp. salt
*1/4 tsp. black pepper
*1 Tbsp. Dijon mustard
*2 Tbsp. Whole-milk Ricotta Cheese (may substitute grated Parmesan cheese)

Instructions:
*Place green beans and 2 cups of water into a medium saucepan. Bring water to boiling over high heat, and cook for 5 minutes, or until green beans are tender when pierced with a fork. Drain and transfer beans to cutting board. Slice beans into bite-sized pieces. Set aside.
*Halve each Brussels sprout, then slice halves into thin strips.
*In a skillet, heat the olive oil over medium-high heat. Add the sprouts and garlic, salt, and pepper. Cook 5 to 7 minutes, or until the sprouts are softened but still slightly crisp, stirring frequently. Add in the beans, Dijon mustard, and ricotta or Parmesan cheese. Cook 1 minute more. Remove from heat and transfer to bowls. Garnish with additional salt and pepper, as needed.


Happy Cooking!

Madison

Friday, January 29, 2010

Peanut Butter-Butterscotch Blondies with Salted Peanut Butter Cream


I wasn't planning on posting anything until after the weekend, but this idea was nagging at me all week, begging "bake me!" And now I'm glad I didn't wait, because it would be cruel and unusual punishment to withhold this recipe from you all. Seriously, this is without a doubt the best recipe to come out of my kitchen in an awfully long time.

One of my favorite food trends to surface in the past year has been kosher salt playing a major role in baked goods. A longtime fan of the salty/sweet combo, my taste buds have been overjoyed with every salted caramel and chocolate that comes my way. Salt works so well with everything sweet because it's a flavor enhancer, so in the right amounts it can enhance the flavor of anything, including sweets. Don't believe me? Add a tiny bit of kosher salt to your ice cream, chocolate cake, or banana tart. Not a lot, just a little is enough to make the flavors of any sweet amazingly better.

Better yet, instead of sprinkling salt on to ice cream or chocolate cake (because you can always do that some other time) run to the kitchen, preheat the oven, and get to making these salted blondies. But whatever you do, make sure you have someone in mind to share these with because one slice could easily turn into two, or three. Don't say you haven't been warned.
Creamed butter

After the sugar, both brown and granulated, have been added

Adding in the 1/2 cup of peanut butter

Post peanut butter and sour cream additions - light and fluffy

Baking in a 10-inch round tart pan makes serving easy and presentation impressive.
However, you can bake in a 9x13-inch pan if you don't have a tart pan.

Ingredients:
Blondies
*1 cup (2 sticks) unsalted butter, softened
*1 cup packed light-brown sugar
*1/2 cup granulated sugar
*2 eggs
*1 1/2 teaspoons coarse (kosher) salt
*1/2 cup creamy peanut butter
*1/4 cup sour cream
*2 teaspoons vanilla extract
*2 cups all-purpose flour
*1 (12-oz.) package butterscotch chips
Salted Peanut Butter Cream
*1/2 cup creamy peanut butter
*4 Tbsp. unsalted butter
*1/2 tsp. coarse (kosher) salt
*1/4 cup milk
*3 cups powdered sugar

Instructions:
*Preheat oven to 350*F. Grease a 10-inch round tart pan (9x13-inch pan may be substituted). Set aside. With an electric mixer, beat butter at medium to high speed until creamy, about 1 minute. Add in granulated sugar and brown sugar; beat until fluffy and well-combined, about 2 minutes, stopping to scrape the bowl once.
*Add in eggs, one at a time, beating until just combined. Add in salt, creamy peanut butter, and sour cream. Beat until well-combined and fluffy. The batter will be light and airy. Add in extract.
*Mix in flour in two additions, beating just until combined. Stir in butterscotch chips by hand.
*Transfer mixture to pan and spread evenly to edges. Bake for 40 minutes, or until the edges are crisp and brown, and center is golden.
*Allow blondie to cool on a wire rack until completely cool.
*Meanwhile, cream together peanut butter and butter. Add in salt, milk, and powdered sugar, beating until creamy and well combined. Spread atop blondie, sprinkle with additional kosher salt, if desired.


Happy baking!

Madison

Tuesday, January 26, 2010

Basic Bread Dough


In the last two months, I've had a revelation. 

It started with a loaf of cranberry walnut bread from Great Harvest, and after one bite I was immediately filled with regret. I, like almost everyone else, had been buying generic, mass-produced, whole-wheat bread from the grocery store and was eating my way through life, ignorant of how deliciously different freshly-baked bread tastes. This revelation was followed by another, equally important one. Baking bread yourself can be every bit as easy.  

It's not that bread baking has become a regular part of my life or that I've sworn off regular, store-bought bread (I actually have a loaf in my pantry right now). But I do find a simple dough both rewarding and convenient in many circumstances, and kneading the dough serves as a great 5 minute stress reliever. If you've been afraid to try bread-baking, like I was for many years, start off with this recipe to get your feet wet. 

Since homemade pizza is one of my favorite foods from my childhood, I used my dough as pizza crust. However, after the dough doubles in size, you could easily put the dough onto a baking sheet and bake at 350*F until the loaf is golden, or use the dough as you would for cinnamon rolls. 


Ingredients: 
Dough
*1 cup warm water (around 110*F)
*1 packet active dry yeast
*1 Tbsp. olive oil
*1 tsp. salt
*2 1/2 cups bread or all-purpose flour

For Pizza
*2 cups pizza or marinara sauce
*2 cups mozzarella cheese (more if you like your pizza very cheesy)
*Toppings of choice (I used spinach on my pizza) 

Instructions:
*Preheat oven to 350*F. 
*In bowl, combine water and yeast. Stir until yeast is dissolved and bubbles form on the surface. Add in the olive oil and salt. Stir until salt is dissolved. 
*Add in 2 cups of the flour and stir until well-combined. Dough will be sticky. Turn onto a floured surface and slowly add in the remaining 1/2 cup flour. 
*Knead the dough for 5 minutes, until the dough is smooth and elastic. Place in a clean, greased bowl. Cover with a towel and allow to rise in a place free from cold drafts. I put my oven heat on low, open the door, and let the dough rise on the stove so there is plenty of warm air. Allow the dough to rise for 30 minutes, or until doubled in size. 
*Punch dough down and spread onto a greased baking sheet. 
*Top with sauce, cheese, and whatever toppings you choose. Bake at 350*F for 25 to 30 minutes, until crust is golden and cheese is bubbly. 

Happy Cooking!

Madison 


Thursday, January 21, 2010

Craft Project: Cookies


Anyone who knows me would be able to tell you that Hobby Lobby is the bain of my existence. I have a very passionate love/hate relationship with the place. Sure, I find myself spending hours browsing through aisles upon isles of paper, fabric, stickers, and ribbon. In my mind I am Martha Stewart. I will buy those craft supplies, hurry home, and any number of beautiful hand-made cards, floral arrangements, and customized lamp-shades, after which I will step back, admire my work, and say, "It's a good thing." Yes, Saint Martha would be pround of the self I invision while in Hobby Lobby.

In reality, I lug home more than I even know what to do with, spending too much, and getting frustrated when I realize that not only have I wasted money, but valuable time as well. But despite all of this, I still get that craft bug time and time again, so I've developed coping mechanisms: easy craft projects that take little skill to accomplish, just a bit of time, but not too much.

Over in my neck of the woods, we've been bombarded with heavy fog for two straight days, followed by an ice storm, neither of which really inspire much of anything other than that 'blah it's winter' feeling. So today I will be bringing a smile-inducing treat to work with an extra bit of presentation added in.

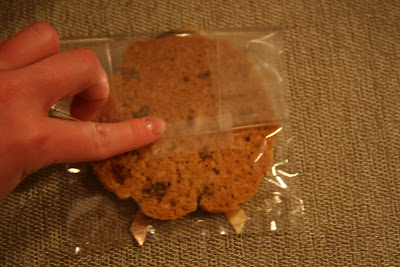
You can buy these plastic treat bags pretty much anywhere. I picked mine up at Super-Target, which had a large variety to choose from. Inside, I've placed one over-sized oatmeal-golden raisin cookie, just make sure they are completely cool. I used this recipe with a healthy twist. I added in two tablespoons of ground flax seed, and made the cookies with whole wheat flour, figuring they could serve as a breakfast cookie if people ate them in the morning.


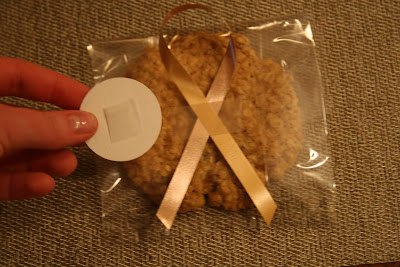
I folded the top of the bag down, and secured it with a piece of tape. On the front side I cut a piece of ribbon, about six inches in length, and made a simple loop shape, secured with a piece of tape. Then, I used my circle-punch (yes, one of those impulse Hobby Lobby buys) and punched out a couple dozen circles from craft paper. Because of lack of creativity, I hand-wrote "Happy Thursday," I'm sure you have something better to say. :) And that's it! Easy to transport, practically fool-proof, and 100% delicious. Something I think even Martha would say is a good thing.

Happy Baking!

Madison

Tuesday, January 19, 2010

Spinach and Shrimp Crostini with Mozzarella


As a food editor at Better Homes and Gardens, it's my job to think about food all day - planning, photographing, tasting, testing, and writing. So despite my love for all things food, when I get home at the end of the day, actually making myself dinner takes more than a little effort. Throughout the day thoughts of what I could do for dinner with the items at home float through my mind, but when I kick off my shoes and actually think about cooking it seems daunting.

Moms, working adults, college students - everyone has something in common; we're tired! Weekends and special events may prompt more elaborate recipes and meals, while dishes like Spinach and Shrimp Crostini with Mozzarella are perfect for weeknights. It took me less than 30 minutes to whip this up, and about 5 minutes to eat it! :)


Ingredients:
*4 slices french bread or other type of bread, toasted
*1 1/2 cups frozen spinach
*1 tsp. olive oil
*1/2 tsp. salt
*1/4 tsp. black pepper
*1 tsp. Dijon mustard
*2 tsp. balsamic vinegar
*8-12 large shrimp, peeled and deveined
*1 clove garlic, minced
*1 tsp. butter
*4 slices mozzarella cheese, about 2 oz.

Instructions:
*Preheat oven broiler.
*In skillet over medium-high heat, cook spinach and olive oil until leaves are softened, about 5 minutes. Remove from heat and place in a food processor. Add in salt, black pepper, Dijon mustard, and vinegar. Process 1 minute or until smooth. Set aside.
*Remove the tails of shrimp and discard tails. Chop shrimp into pieces. Cook in a skillet (I used the same one the spinach was in to save on dishes) over medium heat with the garlic and butter, about 5 minutes, or until shrimp are pink and cooked through. Remove from heat.
*Evenly divide the spinach mixture over the four pieces of toast, followed by the shrimp. Top each slice with a piece of mozzarella. Place on a baking sheet, under the broiler, until cheese is melted. Remove from oven and enjoy!

Happy Cooking!

Madison

Saturday, January 16, 2010

Cooking School: Butternut Squash


If you're like me, it took you a while to attempt to cook a butternut squash. Maybe it's something you reserve only for the holidays, or maybe, you would rather just run away and not think about these mysterious looking winter squash. I'm right there with you, because for years I preferred to leave the cutting and roasting of squash in more capable hands. Fortunately, you all can learn from my mistake, because there is no reason not to make butternut squash a part of your every week. And thankfully they store for up to a couple months in a cool pantry, which is how they got the name winter squash in the first place since they store very well throughout the winter.


Butternut squash are notoriously hard to cut, as are many squash varieties. Start by preheating your oven to 400*F. Then, to make this task easier, pierce the squash with the tip of your knife 6 or 7 times. Place the squash in a microwave, on high, for 3 minutes. This will soften the squash and make it easier to cut.

Remove the squash from the microwave, and bring to a cutting board. Starting at the top of the squash and working with the tip of your knife first, make a vertical cut through the middle of the squash. Remember: keep the tip of your knife down. This will make your work easier and safer. Work your way down one side and up the back. The squash should split right open.

Scoop out the seeds and pulp with a spoon and discard. Place the squash halves in a baking dish or on a baking sheet. Drizzle with a couple tablespoons of olive oil, and sprinkle with either salt and pepper or brown sugar.

I prefer to draw out the savory side, so I use salt and pepper, but if you're looking for a sweet treat, a couple tablespoons of brown sugar and a dusting of ground cinnamon is the way to go. In my squash, I placed three cloves of whole, peeled garlic in the centers of each half, then discarded them after baking. If you're embracing the sweet side, go ahead and skip the garlic.


Bake your squash for 45 minutes to 1 hour, until you can easily pierce it with a fork. Remove from the oven and allow to cool slightly, about 5 to 10 minutes. At this point you can either scoop out the pulp with a spoon, mix with a little extra butter, and salt/pepper or brown sugar. Or, eat it like I did, straight out of the shell with a fork.

Happy cooking!

Madison


Wednesday, January 13, 2010

Homemade Cranberry-Almond Granola


I don't know about you, but I'm a sucker for specialty grocery stores and the health-food sections of regular grocery stores. Countless hours of my life have been spent wandering through isles, transfixed by pretty packaging and obscure, high-quality ingredients. There are many instances when I believe it's worth the splurge. Cheese, seafood, olive oil, certain cuts of meat? Totally worth the splurge.

But no matter where I buy my groceries, the absurdly high price of granola (even the cheapest option) never ceases to amaze me. I mean, you're basically paying for oats, mixed with some sort of sweetener, typically honey, with a few nuts and dried fruits tossed in. Companies give this granola all types of labels: "Protein Packed" "Antioxidant Rich" "A Full Serving of Fruit!" Truth be told, if you know one basic granola recipe, you can customize it to fit your needs.

Start with the recipe listed here, but don't get caught up in the fruit and nuts I added. If you want a few more antioxidants, add some dried blueberries to the mix, for additional protein just bump up the nuts. Need a few more omega-3s in your diet? Try walnuts! (I think you get the picture) Basically, just have fun with it! And enjoy spending a whole lot less.


Homemade Cranberry-Almond Granola
Adapted from Chow.com

Ingredients:
*3 cups old fashioned rolled oats
*2 Tbsp. brown sugar
*1 tsp. ground cinnamon
*1/4 tsp. salt
*1/3 cup honey
*1/4 cup canola oil
*1 tsp. almond or vanilla extract
*3/4 cup dried cranberries
*1/2 cup golden raisins
*1/2 cup chopped almonds

Instructions:
*Preheat oven to 300*F.
*In large bowl combine oats, brown sugar, cinnamon, and salt. In another bowl, combine honey, oil, and extract and stir until well combined. Pour mixture over oat mixture. Stir until well-combine. Use hands, if necessary.
*Pour mixture into a large baking sheet or pan. Spread into a thin, even layer. Bake 45 minutes, or until golden brown, stirring every 15 minutes. Remove from oven and cool completely. Stir the mixture once or twice while it cools (it will harden as it cools). Once cooled, add in cranberries, raisins, and almonds. Store in an airtight container or zip top bag.


Happy cooking!
Madison

Sunday, January 10, 2010

Spiced Cranberry Shortbread


Settled in to life in the new apartment? Check. Job started and life in full-swing? Check. Living budget established? Check. Mastering the art of grocery shopping on a budget while being a foodie? Well, let's just say I'm working on it. 

Don't get me wrong, there are many great things about growing up, graduating, and living on my own, but one thing I'm really going to miss? The charge account at our grocery store back home, billed directly to mom. Long grocery lists for whatever recipe that struck me as delicious accounted for a pretty hefty monthly grocery bill, I'm sure. If nothing else, my mom deserves credit for teaching me how to cook since she played the role of financier. 

What I really love, if you can't tell by now, are simple recipes. So simple that after making them a couple times you remember them by heart and feel comfortable enough to mix it up to suit your tastes, or whatever might be in the pantry. Another perk of simple recipes? They usually end up being inexpensive, allowing you to create something sinfully delicious with ordinary ingredients. Case in point? Spiced Cranberry Shortbread. If you don't have dried cranberries, skip them or substitute something else like nuts, raisins, or chocolate chips. What I won't try to do is health-ify this up. It's flour, sugar, a few spices, and lots of butter. Embrace the butter, and enjoy in moderation. Trust me, it's more difficult that it sounds. 


Pre-baked shortbread 

Cooling shortbread 

Ingredients: 
*2 cups all-purpose flour
*1/2 cup sugar
*1 cup dried cranberries 
*1/2 tsp. salt
*1 tsp. ground cinnamon
*1/2 tsp. ground allspice
*2 sticks (1 cup) butter, softened 

Instructions:
*Preheat oven to 350*F. Grease a 10-inch tart pan (you can use an 8-inch cake pan if needed, just increase the baking time by 5 minutes).
*In bowl of an electric mixer, combine all the ingredients, except the butter. Stir until dry ingredients are well-combined. Add in butter and beat until coarse crumbs form. (mixture will not form a ball or combine completely) 
*Pour mixture into pan. Press dough with your fingertips into the pan, paying close attention to the edges. 
*Bake shortbread for 30 minutes or until sides of the shortbread are lightly browned. Remove from oven and cool on wire rack (or, if you're me, balance the pan on a coffee cup!) for 30 minutes. Cut shortbread into pizza-shaped wedges. 

Happy baking!

Madison 


Friday, January 8, 2010

Spiced Black Bean and Turkey Soup

Winter is here in, in a BIG way, and based on the weather forecast for the rest of the country, chances are temperatures have been lingering well below average no mater where you are. It's so terribly cold here that even making a trip to the grocery store (which for me is less than a half a mile) takes an extra kick in the pants, usually from my stomach growling 'feed me!'

Not all too long ago, I used to be intimidated by the idea of making soup. Something about soup, in all its deliciousness, seemed intimidating. But truth be told, soup is one of the easiest meals to make. Of course I'm going to give you the recipe of this Spiced Black Bean and Turkey Soup, but don't get frustrated thinking you need all the ingredients listed; make do with ingredients in your pantry.


This soup recipe makes enough for 4-6 people. Since there's no way I will be able to eat that much soup before it goes bad, I'm freezing half in case friends drop by and I need a homemade meal quick. Anyone else out there have a great soup recipe or family favorite they go to when the temperatures drop?

Ingredients:

*1 (32 oz.) container reduced-sodium chicken broth
*1 can white beans or butter beans
*1 cup milk
*1/2 tsp. ground marjoram or oregano
*1 tsp. salt
*1/2 tsp. cracked black pepper
*1/2 tsp. paprika
*1/2 tsp. rubbed sage
*1/2 tsp. dried thyme
*1 tsp. dried parsley
*1 lb. ground turkey or ground chicken, browned
*1 can black beans
*1/2 cup sliced black olives
Extra parsley and paprika for garnishing (optional)

Instructions:

*In a blender, combine half of the broth and the white beans. Blend until smooth. In large pot, combine broth/bean mixture, remaining broth, milk, and spices. Whisk until well-combined.
*Heat mixture over medium-high heat until hot but not boiling. Add in ground turkey, black beans, and olives.
*Garnish with additional parsley and paprika, if desired.


Enjoy!

Madison

Wednesday, January 6, 2010

Everyday Meatloaf


Last night I had one of my friends over for dinner to catch up, and while we were together the subject of my blog got brought up. If you knew my friend Cassie, and maybe some reading do, she would probably tell you that she can not cook. Personally I think she is probably being a bit too hard on herself, but one thing is for certain: she would never brag about her cooking skills or knowledge of anything kitchen-related.

But really the reason I am telling you all this is because it makes her comment so much more meaningful. While browsing through the recipes posted on Espresso + Cream, Cassie said, "These are things that I can make!" That's exactly the way I hope all of you feel about the recipes posted here. They may not be the fanciest of recipes, but they are delicious, and easy enough for all the "Cassies" out there.


That said, I give you Everyday Meatloaf. Yes, meatloaf, one of the world's most underestimated foods that has unfortunately gotten a bad rap. But there's really nothing not to love. It's economical, hands-off, easy, and with magazines like Bon Appetit naming meatballs the recipe of the year, you have every right to call it gourmet, too. So warm up the oven, crack and egg or two, get your hands a little dirty, and treat everyone to a taste of home.

Ingredients:
*1 lb. ground chuck or ground sirloin
*2 Tbsp. Red Wine (any type of broth will also work)
*1/2 cup cooked oatmeal (about 1/4 cup uncooked plus equal amount of water)
*1 egg
*1/2 tsp. salt and 1/4 tsp. black pepper
*1 tsp. dried parsley
*1 tsp. dried thyme
*2 Tbsp. grated Parmesan cheese (optional)

Glaze:
*1/4 cup ketchup
*1 Tbsp. Balsamic Vinegar
*1 tsp. brown sugar


Instructions:
*Preheat oven to 350F.
*In large bowl, gently mix together all the above ingredients until well-combined, besides the glaze. Transfer meatloaf mixture to a greased baking dish (8x8 or larger). Form into a loaf shape, with a 'dome' shape on top.
*Mix together ingredients for glaze. Brush on top of loaf (you may have some glaze left over). Bake for 1 hour.


Happy Cooking!
Madison
Related Posts Plugin for WordPress, Blogger...