Tuesday, December 29, 2009
Warm Balsamic-Poppy Seed Salad
The snow is everywhere here and it is cold, very cold. I'm positive that no matter how many Iowa winters I endure, I will never truly grow accustomed to temperatures that dip into the negatives. I'm convinced if New Year's were to fall during June or July, when temperatures are sweltering, resolving to eat healthier and lighter fare would be much easier than in January when you live in an only slightly milder version of the North Pole.
Since that's just not the case, my 'lighten-up' salads during the winter are often filled with flavors both savory and sweet, with dressings that are deceptively rich. In truth, I think eating toast with very liberal amounts of crunchy peanut butter would be the perfect breakfast and lunch day after day, but that hardly seems like a good healthy eating technique, and much less exciting to share with you dear readers.
This salad is an example of a salad warmed up for winter weather. Filled with veggies, fruit, toasted pecans and a delicious balsamic-poppy seed dressing, it's sure to satisfy even the most intense cravings for rich, decadent food. One last tip - warming the dressing slightly in the microwave before pouring it over the salad is a great way to add an extra boost of comfort to any salad.
Ingredients:
*Romaine lettuce
*1 medium apple, chopped
*2 Tbsp. chopped pecans
*2 Tbsp. dried cranberries
*Dressing: 2 parts balsamic vinaigrette, 1 part light poppy seed dressing
Instructions:
*Toss together an enjoy!
Happy cooking!
Madison
Labels:
apples,
poppy seed,
salad
Saturday, December 26, 2009
Green Detox Smoothie
Thanksgiving and Christmas have passed, and my guess is that many of you are in need of a break. A break from butter and sugar and almost anything sweet that comes out of an oven, only to be covered in icing and powdered sugar or topped with whipped cream (and maybe even a break from family). So while I have a delicious oatmeal-coconut cookie recipe to share and a fruit pie that is to die for, I'm moving on to lighter, healthier fare - the kind that makes you feel good about what you just put into your body.
I love to eat, and because of that you will never see me posting anything about the Master Cleanse diet - a celebrity diet consisting of drinking nothing more than water mixed with lemon juice, cayenne pepper, and maple syrup. If that's a detox, I want nothing to do with it! But after the holiday season has come and gone, I find myself needed to lighten it up a bit.
It doesn't get any healthier, or easier, than this smoothie. Packed inside this little glass is a serving of veggies (yes, veggies), fruit, and dairy. And when paired with a salad for lunch, it packs even more punch. As usual, feel free to play around with the fruit in this smoothie. The spinach is a great choice for the veggie because it has a very mild, and slightly sweet flavor that doesn't overpower the sweetness in the yogurt and fruit. Trust me, you won't even know the spinach is there.
Ingredients:
1 (6-8 oz.) yogurt (preferably one with 100 calories or less)
1/4 cup skim milk
1/2 cup fresh or frozen spinach
1/2 banana
2 handfuls ice
1 Tbsp. lemon or lime juice
Instructions:
*Mix all the above ingredients together in a blender until smooth. Top with grated lemon peel, if desired.
Tuesday, December 22, 2009
Outstanding Christmas Butter Cookies
I didn't intend to leave the blog unintended over the past week, what with it being the peak of Christmas cookie season and all, but this past week has left practically no time for baking, and almost everything I've eaten has been take-out, from a restaurant, or a box of cereal. Hardly worth blogging about. What has been keeping me so busy? A little thing called graduation and all that goes with it: family visiting from Florida and moving into a new apartment! After an exhausting week of settling into a new place I was more than ready to bake, listen to Christmas music, and to present to you the most delicious Christmas cookie recipe I've found in quite some time.
Mom and me at graduation
This entire Christmas season, I've been struggling to find a cookie recipe that was inspiring. Typically, I spend an entire day in full cookie production, baking anywhere from 6 to 12 different kinds of cookies. But this year I was in search of one perfect cookie. One perfect cookie enough to surpass a dozen average ones. Where did I turn? The lovely Deb of Smitten Kitchen, a beautiful blog full of recipes that always deliver.
Of course, I thought it necessary to make a few changes of my own. Using the base recipe provided by Dorie Greenspan via Smitten Kitchen, I tossed in a half a cup of dried cranberries and a teaspoon of cinnamon. In the second batch, since my mom always taught me to double every batch of Christmas cookies, I tossed in 2 Tbsp. cocoa powder, 1/2 cup toffee bits, and 1 tsp. cinnamon.
Light and mildly sweet, these cookies are not your average Christmas cookie. They sing of sophistication and simplicity, begging to be eaten with a cup of coffee or hot chocolate, perfect for when friends drop by, or for sending in the mail to those you love, since they are sure to bring a smile to the face of everyone who receives them.
Happy Baking!
Madison
Labels:
Christmas,
cookies,
graduation,
shortbread
Friday, December 11, 2009
Green Goddess Pasta
There's something undeniably sexy about pasta of any and every sort. In my opinion, it's the sexiest of all foods, far surpassing the usual suspects: oysters, caviar, champagne. Maybe it's because for me pasta has always been a bit of a 'forbidden' food. But truly, pasta can be delicious and healthy. Case in point? Green Goddess Pasta.
The base of this dish is 100% whole wheat spinach pasta, but any pasta would work just fine. One of my favorite tricks for stretching pasta is adding a bit of zucchini to the mix. Long, thin strips of zucchini made with a vegetable peeler, then sauteed in a bit of olive oil and tossed in with the pasta adds a mix of textures and tastes, and is a great trick for getting picky eaters to consume some extra veggies.
But the real star of this dish is the sauce. I've posted before on pesto made with a broccoli base. Growing up in a small town where fresh herbs cost an arm and a leg meant pesto was more a luxury than a staple, so using broccoli as the base makes it affordable for everyone. This version of broccoli pesto is adapted for pasta with a creamier texture and a bit more milk added in, serving as a luxurious sauce disguising how truly healthy it is. The amount given in this recipe is enough to serve 4-6 plus leftovers - meaning I have a lot of broccoli pesto sitting in my fridge.
Ingredients
*2 heads broccoli florets, steamed
*2 Tbsp. grated Parmesan cheese
*1 tsp. salt
*1 Tbsp. dried Italian seasoning
*2 cloves garlic, chopped
*1/4 cup slivered almonds
*1/2 tsp. black pepper
*2 Tbsp. olive oil
*1/2 cup milk (I used skim)
Instructions
*Combine all the above ingredients in a food processor 2-3 minutes, scraping sides twice. Pesto will be almost smooth, with slight texture.
*Toss pesto with 1 lb. of spinach pasta or other pasta of choice. Add additional milk of a creamier texture is desired.
Happy Cooking!
Madison
Tuesday, December 8, 2009
For the past couple days I've had my previous post on what I'm thankful for on my mind. Maybe it's residual feelings from Thanksgiving, the anticipation of Christmas, or a bit of both. Truth is, Christmas always makes me all nostalgic - especially nights like tonight when welcoming in the first big blizzard of winter.
To be able to sit in a warm house, wrapped in a blanket, drinking Reindeer Blend coffee while thinking and writing about food - not out of necessity but for enjoyment - is a luxury I take for granted every day.
So today I visited the World Vision web site and browsed their online donations page. World Vision, a non-profit aid organization, allows people to make donations, as well as purchase specific items, such as chickens, seeds, and vaccinations for those in need. Since Espresso and Cream is all about food, I made a general hunger relief donation. I've heard from many of you who read the blog, and would love to encourage any and all of you to make a donation as well. You can give as little or as much as you would like to, and even a dollar can make a difference in someone's life.
Disclaimer: I promise, I am not getting paid by World Vision to say any of this! :) As someone who loves food, knowing even a few more children will have something to eat this year because of the readers of Espresso and Cream would be amazing. If you do feel moved to donate, I'd love to hear from you!
Madison
Sunday, December 6, 2009
Thankful
Coming off a weekend spent with my mom and aunt shopping for furniture to go into my new apartment come January (yay!) I was reminded countless times of how blessed I am. To have a supportive, loving family that is helping me get on my feet as I prepare to graduate and taking the necessary steps to insure I don't have to sleep on the floor in my new apartment! Not to mention the wonderful friends and co-workers I am surrounded with and supported by.
This weekend reminded me of the blessings of family; last Thursday reminded me how much I love work at Better Homes and Gardens. One of the best parts of being an intern (believe it or not, there are a lot of great parts) is that I have been able to get my hands into a lot of different types of projects. Days have been spent in the last six months writing copy, assisting in photo shoots, and filming on-camera for BHG.com. And after last Thursday, I can add another skill: test kitchen cook.
A phone call from one of our editors Thursday morning informed me I would be going down to the test kitchen for some last-minute recipe testing. Just that morning I had been lamenting about the fact that finals have infringed on my holiday baking. Perfect timing, since my recipe testing involved cookies! They weren't exactly holiday cookies, but I'm not going to start getting picky. A cookie is a cookie, right?
In an hour and a half I churned out two different versions of the same cookie - around two dozen of each type. The baking was followed by the difficult task of taste-testing. Did I mention I love working at BHG? Unfortunately I have no recipes to share with you or photos of the final product until the magazine comes out! I promise to post the recipe when it does, because these cookies are worth making.
Happy baking!
Madison
Tuesday, December 1, 2009
Videos, Holidays, and Exams! Oh my!
Today I am writing my apology, to be extended to all you readers for the next three weeks. Though as Christmas approaches I would like nothing more than to be drinking coffee, listening to Christmas music, watching Elf, and baking all types of goodies to share here, I'm sad to report those things will have to wait until December 18th - the highly anticipated, feared, and welcomed day when I graduate from college! Immediately afterward, I plan on getting back on the blogging bandwagon and commit myself to posting plenty of holiday deliciousness.
But in order to graduate, I really must get back to all the homework, reading, and test preparation that stand between me and the third week in December. To tide you over, I am posting the links to a few of the first videos I did for Better Homes and Gardens "100 Days of Holidays," which I think might get the Christmas spirit flowing. Enjoy!
Sunday, November 15, 2009
Havest Dinner Party
I've been saving these pictures, from a dinner party I hosted, for a couple weeks, and am just now getting around to posting them. The guests, Drew and Jean Vogel, and their friends Nick and Cindy DeVries, were the highest bidders at an anual auction in my hometown, and were treated to a dinner at my home, with me playing both chef and waiter for the evening. Knowing they paid money to have me cook, (crazy!) I wanted to make sure they had an evening full of great food.
Along with delicious food, I was determined not to stress and enjoy the evening. I stuck with a menu that was heavy on the prep work and low on hands-on time during the actual meal. For starters, a 3-cheese plate of (from left to right) Gorgonzola, Manchego, and buffalo milk cheese, paired with Quince and fig paste, grapes, crackers, and, of course, wine! My favorite, by far, was the buffalo milk cheese: soft, creamy, and slightly salty.
Instead of stressing over a complicated main-course, I selected something that world do the work itself. Borrowing from the master of science himself, Alton Brown, I made a beef tenderloin that was baked inside a salt-dough crust dotted with herbs. If you've never made a salt-crusted meat of some sort, I would highly recommend it.The crust, a mix of salt, flour, water, and herbs, is rolled out and the meal placed inside. An automatic thermometer is inserted and the meat placed in the oven until the desired temperature is reached. When the meat is done and had time to rest, peel away the salt crust and throw it away and you're left with a delicious, juicy piece of meat like nothing you've ever tasted. The reviews at the dinner ranged from "delicious" to "the best beef I've had in years," and that was from people who love good food! Find the recipe I used here.
There were a lot of other great menu items, but to keep things moving, I selected just a few of the recipes that received the most glowing reviews of the night. One such recipe: this gourmet macaroni and cheese from Bon Apetit. Called the "Cheesemonger's Mac and Cheese," I think it could easily be called the "$40 Mac and Cheese" based on how much delicious, and expensive, cheese it calls for. If you are ever looking for a great groumet mac and cheese recipe for a special occasion when the blue box just won't do, this is it.
I would, without a doubt, say the night was a success. The guests arrived at 7 and stayed well past 11, chatting, enjoying some great food, and wonderful wine. For me, the best part was cooking for people who love food. Though I was nervous about it at first, I realized that when you cook for people who are knowledgeable about food, it's all the more fun because you can share so much with one another.
Happy cooking!
Madison
Labels:
beef,
cheese,
mac and cheese
Wednesday, November 11, 2009
No-Bake Chocolate Clusters
Crazy, busy, wonderful. Those three words really are not even close to being enough to describe my past two weeks, but they will have to suffice for now, because my brain is only functioning at 50% at the moment due to over-use and exhaustion. I've spent the better part of the last couple weeks filming holiday craft and decorating videos for Better Homes and Gardens - 100 Days of Holidays.
I was introduced to a whole new world that doesn't involve food and had the opportunity to learn so much about decorating! It was awesome to spend days going to the Christmas tree farm, decorating wreaths, and hanging garland. It really got me in the holiday spirit, so much so that I feel like Christmas should be right around the corner. The videos aren't online yet, but I'll make sure to post a link when they are, which should be right around Thanksgiving time.
Simplicity is the name of the game for these chocolate clusters, because sometimes you just want a bit of something sweet right now, instead of laboring in the kitchen over a fancy dessert. I melted a bag of milk chocolate chips, though I would have used dark chocolate if we had it around the house, then stirred in a cup of shredded coconut, a cup of chopped pecans, and a half a cup of dried cranberries. Stirred it all together and dropped it in heaping tablespoons onto parchment paper. Give these little chocolate treats a half an hour in the freezer before eating and you have yourself a delicious and quick no-bake chocolate dessert.
Happy cooking!
Madison
Labels:
chocolate,
chocolate clusters,
pecans,
raisins
Saturday, November 7, 2009
Peanut Butter and Jelly Oats
We've been having unseasonably warm weather here in Iowa. It's November and today warmed into a lovely, sunny, 74 degree day. Winter can stay at bay for at least another month as far as I'm concerned, which is probably wishful thinking, but a girl can hope, right?
Happy weather calls for even happier food. Familiar favorites that make you smile and want to linger at the table for just a few more minutes. Since breakfast is my 'stay-and-linger' meal of choice, there's no better meal than Peanut Butter and Jelly Oats, for breakfast, or any time of the day.
Ingredients
1/2 cup old-fashioned oats
1 cup water
1 tablespoon peanut butter
1 teaspoon ground cinnamon
1 teaspoon brown sugar
1/8 teaspoon salt
1 tablespoon jelly or jam (I used red raspberry)
Walnuts or pecans (optional)
Instructions
*Mix together oats and water. Microwave on high for 1 minute, stirring at 30 seconds. Remove from microwave and stir in peanut butter, cinnamon, brown sugar, and salt. Top with jelly and nuts.
Happy cooking!
Madison
Labels:
breakfast,
jelly,
oatmeal,
peanut butter
Wednesday, November 4, 2009
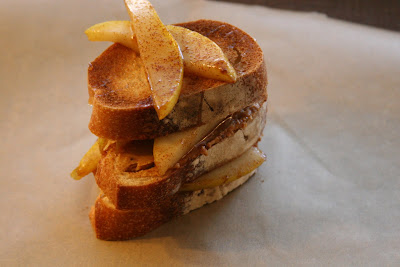
Peanut Butter, Pear, and Honey Stacker
Quite often, I sit down at the end of a busy day and think about what I fixed for myself, only to feel dismayed thinking about food I find to be rather uninspiring. I'm not a chips, fast food, and junk food type of girl, but on busy days I sometimes rely rather heavily on coffee, yogurt, and Lara bars, finished off with a big plate of veggies at the end of the day to balance everything out.
A couple weeks back I was putting together this little sandwich and one of the girls in my sorority asked me, "Why don't you ever eat normal food?" I was rather confused by her question. "What in the world are you talking about? The foods I eat are normal!" I wanted to say, but instead I simply shrugged and settled for a, "Looks normal to me."
This sandwich really isn't much of a recipe, but it sure does hit the spot for lunch or a light dinner. I've never been much of a peanut butter and banana sandwich girl, but switch the bananas out of pears and add a drizzle of honey and I'm there. Depending on how firm your pears are, it may help to saute them in a tiny bit of butter with a touch of cinnamon just to soften them up, about 3 to 4 minutes. Layer the pears on a couple slices of bread coated with peanut butter and top it off with a drizzle of honey. Pure perfection.
Happy cooking!
Madison
Labels:
peanut butter,
peanut butter pear stacker,
pears,
sandwich
Sunday, November 1, 2009
Chocolate-Peanut Butter Truffles
Maybe it's a bit too early to start thinking about favorite holiday treats. But since Halloween is over and done with, I have decided it's entirely appropriate to start posting any and all treats that remind me of Thanksgiving, and particularly, Christmas. For years growing up I tasted these sweet little peanut butter-chocolate morsels of deliciousness and thought they must be terribly difficult to make. If big flavor was any indication of difficulty level, they would most certainly take forever to make.
Thankfully that rule does not hold true. Especially in this case. When I was let in on the recipe to these Chocolate-Peanut Butter Truffles, I was shocked at how simple they are to make. They have become my go-to treat for pretty little hostess gifts and parties of all sorts, because let's be honest, who doesn't like peanut butter and chocolate? Put them together in a bite-sized dessert and it's game over. Give it a try. Make them, set them out, and watch them disappear.
Ingredients
*1 package vanilla sandwich cookies or Golden Oreos
*1 (8-oz.) package cream cheese
*1/2 cup peanut butter
*1 package chocolate almond bark
*Toffee bits, chopped chocolate, or other candy for garnish
Instructions
*In a food processor, blend cookies until fine crumbs form, about 2-3 minutes. Add in cream cheese and peanut butter. Process until evenly blended. Transfer to bowl and refrigerate at least 1 hour.
*Melt almond bark in microwave safe bowl on high for 3-4 minutes. Stirring every 30 seconds, until almond bark is smooth and glossy.
*Form dough into 1-inch balls. Dip into chocolate and transfer to waxed paper to try. Top with candy garnish of choice.
Labels:
chocolate,
peanut butter,
truffles
Thursday, October 22, 2009
Gluten-free Cranberry-Pear Crumble Pie
Rainy days and nights. We seem to be having a lot of rainy days in Central Iowa and lately all I've wanted to do when it's raining is to sit inside and hole up under a pile of blankets. I've found my happy place. Rainy night and howling wind, I'm hiding under the covers while watching Gossip Girl, drinking coffee, and blogging about pie. Gluten-free Cranberry-Pear Crumble Pie at that.
Disclaimer: I have very little practical knowledge of gluten-free anything. The number of times I have attempted to bake anything gluten free could be counted on one finger. Since so many people have been following a gluten-free diet lately for various health reasons, I figured I would jump on board...at least every once in a while.
If I could, I would give you the recipe for this pie, but since I was just throwing and tossing a bit of this and a bit of that into the filling, I'm afraid I don't have one. It amounted to something like 5 sliced pears, 1 cup dried cranberries, 1 teaspoon each of cinnamon and nutmeg, 1/2 cup of brown sugar, 3 tablespoons of gluten-free flour, and 2 tablespoons of butter dotted on top of the filling. The crumble on top was 1/4 cup gluten-free flour, 1/4 cup brown sugar, and 2 tablespoons butter blended with a pastry cutter or fork until crumbly.
But the filling really isn't the most difficult part when it comes to gluten-free baking. My nemesis? The crust! I picked up a package of Bob's Red Mill Gluten-Free Baking Mix, but I know there are a lot of other gluten-free flours suitable for baking. I followed a basic butter pastry recipe, but substituted my new flour.
The pie baked at 375F for around 40 minutes, or until the pears felt crisp-tender. During the last 10 minutes of baking, I covered the top of the pie with foil to prevent the crust from over-browning. After letting it cool, it was time for the taste test.....
Not bad. Not bad at all. Actually, it was pretty good! The pear-cranberry combination was delicious, as was the crumble on top. The crust was noticeably different in texture and taste. It was a bit more challenging to work with, because it pulled apart easier, and was a bit more cracker-like once baked. Heather Morgan Shott, Senior Food Editor of Better Homes and Gardens online, lives gluten-free and told me the secret to gluten-free pastry is Xanthan Gum, and after looking at a few websites, it seems as if a teaspoon is all it takes to help the pastry roll out better withouth falling apart.
Do any of you follow a gluten-free diet or have you ever done any gluten-free baking?
Happy cooking!
Madison
Labels:
cranberry-pear pie,
gluten-free,
pie
Monday, October 19, 2009
Fruit and Nut Breakfast Muffins
Whew! After a crazy two weeks of papers, tests, and general craziness there was nothing more I wanted to do than mentally check out of school mode and into creative baking mode. Nothing even remotely related to school was allowed this past weekend, just baking and more baking. Of course, man (or woman) can not survive on decadent sweets alone.
For that reason, I give you Fruit and Nut Breakfast Muffins. Truly healthy, hearty, and utterly satisfying in every sense of the word. The whole wheat flour and fruit make these treats dense and give them a texture that's part scone, part cakey muffin. I all but eliminated sugar in the batter, used all whole-wheat flour, tossed in some rolled oats, and cut down the oil to only 1/4 cup. The fruit in these muffins? Dates! One of Mother Nature's most delicious, fruity gifts. Because of the natural sugar in the dates, I figured cutting the added sugar wouldn't be a problem.
These muffins are best when straight from the oven with a bit of butter, but are also great the next day re-heated with a touch of peanut butter. Well, I say peanut butter because I think it tastes great on everything, but maybe fruit preserves would be a bit more appropriate for most people. :)
Ingredients
1 1/2 cups whole-wheat flour
1/4 cup brown sugar
2 tsp. baking powder
1/2 cup rolled oats
1/4 tsp. salt
1/2 tsp. cinnamon
1/2 tsp. nutmeg
1 egg, slightly beaten
1 1/4 cups fat-free or 2% milk
1/4 cup vegetable oil
1 package dates, coarsely chopped
1/4 cup chopped pecans
Instructions
*Preheat oven to 350F.
*Mix together the flour, brown sugar, baking powder, rolled oats, salt, cinnamon, and nutmeg.
*With an electric mixer on medium speed, beat in egg, milk, and oil until well combined.
*Stir in dates and pecans. Spoon batter into greased muffin tins, 2/3 full.
*Bake muffins at 350 for 10 minutes, or until tops are lightly browned and toothpick inserted into center comes out clean.
Happy cooking!
Madison
Wednesday, October 14, 2009
Too Good to Be True Banana Ice Ceam
I'm constantly stuck between a rock and a hard place, where my health-nut side battles it out with my sweet tooth's love of ice cream. There are many sweets I could do without, but when it comes to ice cream, I'm hopeless. Something about the cool, creamy goodness draws me in, no matter the season. But even low-fat and reduced-sugar varieties of ice cream can hardly be considered healthy, so alas, ice cream remains a treat rather than a dietary staple. Until now.....
For those of you in the same boat as me, I give you reason to rejoice and eat ice cream without guilt. I can't begin to claim any part in the discovery of this brilliant idea, the credit goes to Kath of Kath Eats Real Food, who found it from yet another blogger. When I first read about this Banana Ice Cream, I thought there was no way it actually worked. The idea seemed so simple, and I was too curious not to give it a try. If I could make ice cream out of only bananas and nothing else, it was worth the risk of a kitchen disaster just to find out!
The ingredient list isn't even worth writing down it's so simple. Freeze 2-4 bananas for at least 1 day before you plan on making this ice cream; however, if you want to keep bananas on hand in the freezer for a couple weeks at a time, that's fine too and a great way to take advantage of leftover bananas before they go bad.
Chop the bananas into large pieces, and place in a food processor for 4 minutes. About half way through, scrape down the sides, then let the processor do its magic. The bananas go from being, well, bananas to sweet, creamy goodness in just 4 minutes. I added just a touch of vanilla extract to mine, but it's by no means necessary.
That's it! I can hardly believe that frozen bananas in a food processor turn into soft-serve ice cream in four minutes with no added ingredients. Since my first experiment with this banana soft serve, I've topped it with a bit of caramel for a dessert, and also eaten a bit for breakfast with a quarter cup of low-fat granola. It's a perfect way to satisfy your sweet-tooth in one of the healthiest ways possible. Funny thing is, I'm not a huge banana person, and you don't need to be to enjoy this dessert. Banana flavor is present, without being overwhelming, and the vanilla extract takes away a bit of the banana flavor.
Got to run! Off to class. Happy food-processing!
Madison
Friday, October 9, 2009
Broccoli Pesto
Alice in Wonderland. I think the Disney character that best personifies me at this point would be Alice in Wonderland, falling, tumbling into a rabbit's hole and disappearing from the world. Substitute the rabbit's hole for work, classrooms, and the small nook where my desk and computer live and there you have it, my reasons for disappearing from the known world, as well as the blogging world.
Lately, my cooking has been more utilitarian and droll than exciting and adventurous, living on healthy, quick staples like whole grain bread, Greek yogurt, Lara bars, and whatever vegetables I can toss on a roasting pan at the end of a day (usually broccoli or zucchini.) While I may spend this upcoming weekend plowing through papers and test preparation, mini apple pies are also scheduled in as a stress-relieving study break. In the meantime, Broccoli Pesto got me back to the blog. I felt it absolutely necessary to share this recipe that's as quick as it is healthy.
I'm not even sure this counts as a recipe. It was more of a throwing and tossing affair, a bit of this and a bit of that, but here is what it amounted to. After zapping a cup of broccoli in the microwave for 4 minutes, I tossed it into the food processor, along with an ounce of cheese (I used shaved Parmesan, but any cheese will work), a quarter teaspoon of salt, half a teaspoon of Italian seasoning and a drizzle of olive oil (maybe a half teaspoon). I pulsed the ingredients 6-8 times until the mixture was spreadable but still had a bit of texture.
Although I am calling it 'pesto' this mixture is really more of a sandwich in itself, spread generously on top of toasted whole grain bread with a few additional slices of shaved cheese. It made enough for me to spread two slices of bread, plus a bit extra, and was a super yummy way to get in a full serving of veggies, and that is never easy when there's a time crunch!
I've got to run. Teachers seem to like homework deadlines on Fridays, especially Friday afternoons! So much to do, so little time. Happy eating!
Madison
Wednesday, September 30, 2009
Sweet Mistakes
I am posting today in keeping with my promise to share both triumphs and failures in the kitchen. While I hope the balance remains heavily on the triumphs side of the scale, today's post might best be classified as a failure. But, as is often the case with baking disasters, something quite delicious and unexpected can often come from a botched attempt at something else. Herein lies the story of these Dark Chocolate Peanut Butter Truffles with Pecans.
While at work yesterday, I was struck with something I thought would be a brilliant chocolate creation. Looking back, it seems like a terrible idea that was not thought out properly, but that's the agony of hindsight, isn't it? Everything seems clearer looking back. But back to the idea, homemade dark chocolate candy bars filled with caramel, coconut, and pecans and topped with melted peanut butter baking chips.
I melted dark chocolate and dolloped a couple tablespoons into each cupcake liner, followed by the caramel, coconut, and pecans. Then, melted the peanut butter chips and capped each chocolate creation off with a generous scoop. In my head, the chocolate would harden, leaving a gooey caramel center and a firm peanut butter top, like a candy bar. In the morning, I realized the sheer magnitude of my creations, and not in a good way. They might have been successful, had I used about 1/8 of the chocolate and peanut butter chips, but what I ended up with were chocolate bricks in the shape of cupcakes - enough to make most people sick to their stomachs after a few bites.
Standing in the kitchen in my pajamas, I felt disappointment start to creep in. Because of the expense of baking, and being that it's not exactly a necessity (though some may beg to differ), I focus most of my foodie energy into meals, saving the baking for trips home when I can raid my mom's pantry. When I do bite the bullet and buy baking supplies, I want whatever I am making to turn out well. I took a breath, cleared my head, and decided that these bricks in front of me could be molded into something much more delicious.
Melting them down was my first course of action, though I didn't know what I would do afterwards. I placed everything, coconut, caramel, pecans, dark chocolate, and peanut butter chocolate into a pan and began the process of melting it, hoping for some sort of silky goodness. What I got instead was a consistency more akin to cookie dough than melted chocolate.
Confused as to what I should do next, I transferred the chocolate dough to a bowl and added a cup of creamy peanut butter, after which I formed the dough into 1-inch balls. Realizing these now were fairly similar to chocolate truffles, I rolled them in cocoa powder and placed each truffle in its own paper baking liner. The result? Pure chocolatey peanut butter deliciousness! The pecans gave them a nice crunch, and surprisingly, they stayed soft. I would love to give you the recipe, but it will have to wait until I am able to try them again, this time intentionally. Here's to making disasters in the kitchen something worth savoring!
Madison
Labels:
chocolate,
peanut butter,
truffles
Monday, September 28, 2009
Southern Comfort
Think about the foods that make you feel like you're home. What are they? Cookies, lasagna, a favorite pie, or maybe a soup. A few things come to mind when I think about home-cooking. My mom's meatballs, beef stew with biscuits, and a fresh garden salad with poppyseed-balsamic dressing. But really, for me, it's all about the Southern cooking. We're talking grits, pinto beans with ham, cornbread with butter, and rice. My dad's side of the family comes from the South, and while I would never classify either of my parents as classic Southern cooks, I have developed a taste for the best of what the South has to offer.
My taste buds prefer sweet barbecue pulled-pork sandwiches, and cornbread should always be salty and served with butter. And let's not even start on sweet tea. So it's really no surprise that one of the top priorities, aside from family time, on my trip to North Carolina was to get some of that good Southern cooking. Funny as it may be, I just love Cracker Barrel, so to Cracker Barrel we went (twice).
While there, I treated myself to grilled Trout, pinto beans, chicken tenders, and indulged a bit in cornbread muffins and fried okra. The pictures just don't do this food justice, but then again, I don't think Southern food was made with the intention to be photographically beautiful. Nope, just looked at the pitctures again, not nearly as pretty as it was tasty.
It was a short trip, less than 24 hours in North Carolina, but a beautiful time regardless. Just returning to my grandma's house, and spending time with a woman who seems much more like Mrs. Claus than any shopping mall impersonation, and getting to listen to her tell stories of our family history for hours was one of the most wondrous things I've done in a long time. Family really is the most beautiful gift of all, and when food traditions are added in, it's all the better!
Madison
Friday, September 25, 2009
Outstanding Oatmeal Raisin Cookies
Allow yourself a couple extra minutes to read this post. Settle in, kick up your feet, and take a trip to The Hamptons withme, East Hampton to be precise. We would drive up a long gravel driveway and pull up to a rather large house, which wouldn't be all that unusual considering the neighborhood we are in. In fact, it would look much like every other house if not for an unusual structure across the yard from the main building. At first glance, it looks like a barn, until we get closer and realize that it's so much more than a building used to house farm animals.
The scents wafting from this unusually beautiful barn are tempting and sweet, urging us to pick up our pace and discover the source of this decadent aroma. We knock on the door, because barns don't have doorbells of course. A few moments pass before the door swings gently open. In the doorway stands none other than The Barefoot Contessa, Ina Garten, holding a plate of the most delicious-looking cookies we have ever seen. Because she is The Barefoot Contessa and always ready for company, she invites us in to enjoy these sweet treats. It's like having your mom bake you cookies as a child, but this time you are an adult, and The Barefoot Contessa has taken over mom's post.
In reality, I am a fraud. I don't know what Ina Garten's home in The Hamptons looks like, or where her barn is situated on the property. And I'm guessing she is not sitting around, baking cookies, waiting for complete strangers to trespass on her property so she can invite them in with open arms and a plate of hot cookies. But to me, that is Ina, warm and affable and a truly amazing cook and hostess to even the most insignificant of guests.
When my own mother bought me The Barefoot Contessa's Back to Basics cookbook, I was skeptical. Could anything replace the all-encompassing and flawless Ultimate Southern Living Cookbook? I was willing to give it a try, at least for the sake of being a gracious gift-receiver. From the first recipe, I was captured. One after another, each recipe as flawless as the last, Ina Garten's fresh and minimal recipes were exactly as I aim to make my own. While I tested out the savory recipes, my mom embraced the sweets.
If ever there were a professional cookie connoisseur certification, my mom would certainly have a framed certificate of her very own. So when she began to rave about the oatmeal raisin cookies from Ina's book, I knew they must be something special. It was months before I came home from college and tried one of these cookies. In the meantime, many a night I would call to chat with my mom, only to find out she was baking yet another batch of cookies to share with friends, family, and co-workers.
The minute I bit into one of these little treats myself, I was sold. Crispy edges, chewy centers, chock full of oatmeal, raisins, and toasted pecans, I can't imagine a better cookie. Unfortunately I can't share the recipe with you all, for fear of copyright infringement, but I can tell you these cookies make buying the cookbook worth it. Even if you do not like anything else in the entire book.... it's all about these cookies. When we make them at home, they are usually larger than the ones I've made here. Over-sized, wrapped in cellophane, and tied with ribbon, they make the perfect gift. Something about these cookies whispers sophistication, just as I imagine Ina herself would.
Heading down south to North Carolina with my dad to see my grandma this weekend. Expect some great Southern food to be featured in my next post. Yum!
Madison
Labels:
Barefoot Contessa,
cookies,
Ina Garten,
oatmeal raisin cookies
Wednesday, September 23, 2009
Turkey Burgers with Broccoli Tomato Salad
Tired. The word of the day, week, and maybe even the month! It's not so much the kind of tired that you feel when you had one night of bad rest, but rather, the kind of exhaustion you feel when that one night of bad rest becomes multiple nights and tasks and responsibilities pile up. I don't have kids or a family, but I think I'm beginning to understand why so many moms resort to the help of take-out when exhaustion settles in.
But let's be honest, take-out can be a minefield to navigate. Often expensive and unhealthy, sometimes getting back in the kitchen is truly the best option. Truth be told, it dinner doesn't have to be an elaborate production. There are nights for that, and then there are nights when it's just about nutrition and fuel, and if it tastes great, count it a bonus.
So while this may not be the definition of culinary brilliance, it does meet the basic requirements of a healthy, tasty, weeknight-friendly meal. A nice way to add a little extra weight to this meal would be to put the turkey burger on a whole-wheat roll with some typical burger toppings, like lettuce and tomato. The salad oh so good! Chopped broccoli, tomatoes, feta cheese, and a bit of balsamic vinaigrette make it super simple. Serve it cold and enjoy the leftovers for lunch.
Turkey Burgers:
*1 lb. ground turkey
*2 Tbsp. Dijon mustard
*1/2 tsp. salt
*1 tsp. Italian seasoning
*1/2 cup shredded mozzarella cheese
Mix together the above ingredients and form into 4 patties. Grill or pan-fry over medium-high heat, 5 to 6 minutes per side, or until no pink remains. Place burgers on foil lined baking sheet. Turn oven to broil. Sprinkle the cheese over the four burgers and place broil for 2 minutes, until cheese is nicely browned.
Broccoli Tomato Salad:
*1 head broccoli, steamed and chopped
*4 medium tomatoes, chopped
*4 oz. feta cheese, crumbled
*4 Tbsp. balsamic vinaigrette
*1/2 tsp. salt
*1/2 tsp. ground black pepper
Mix together the above ingredients and refrigerate for 15-20 minutes, until chilled. Serve with turkey burgers.
The bottom line? Life is too short and cooking too fun to stress about weeknight meals. Let these recipes get you on the path to healthy, family-friendly cooking when time and energy is running low.
Madison
Labels:
broccoli,
burgers,
feta cheese,
tomatoes,
turkey